![JSAUX anti-glare matte screen protector for ROG Ally and ROG Xbox Ally series #style_[2-pack] for all rog ally models](http://jsaux.com/cdn/shop/files/GP0113A-Anti-Glare-Screen-Protector-for-ROG-Ally-_-ROG-Xbox-Ally-Series-1_jpg.png?v=1762310072&width=92)


![Grey 2-pack 90 degree USB-C to USB-C right angle adapters #style_grey [2-pack]](http://jsaux.com/cdn/shop/files/90_-USB-C-to-USB-C-Right-Angle-Adapter-grey-1.png?v=1755238920&width=92)


![JSAUX anti-glare screen protector 2-pack for Lenovo Legion Go 2 with alignment frame #model_for legion go 2 [2-pack]](http://jsaux.com/cdn/shop/files/GP0132-Anti-Glare-Screen-Protector-for-Legion-Go-2-1.png?v=1766136633&width=92)
![JSAUX HD tempered glass screen protector 2-pack for Lenovo Legion Go 2 with alignment frame #model_for legion go 2 [2-pack]](http://jsaux.com/cdn/shop/files/GP0131-HD-Tempered-Glass-Screen-Protector-for-Legion-Go-2-1.png?v=1766136733&width=92)


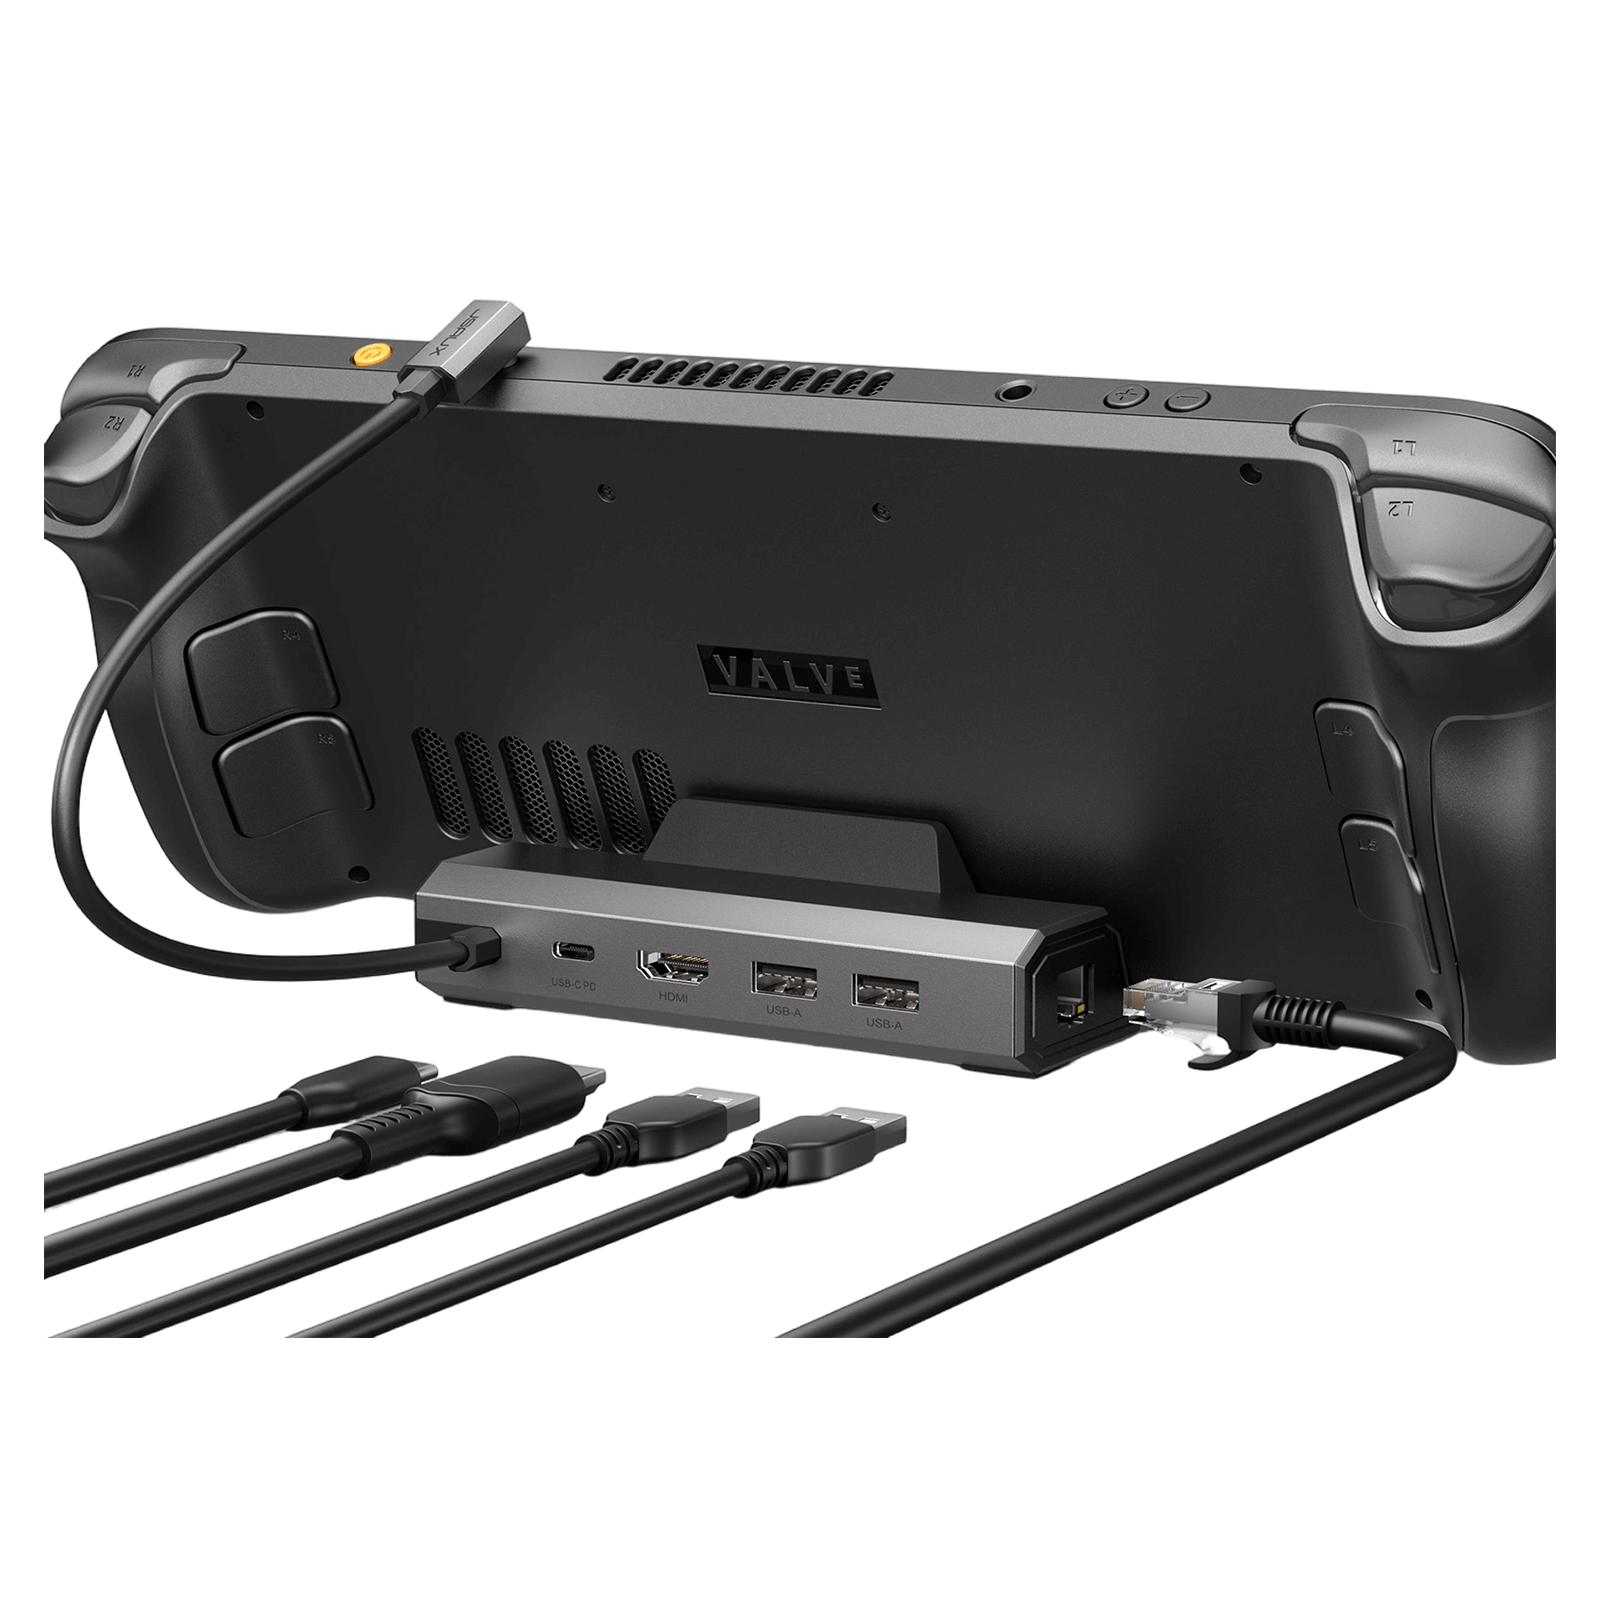
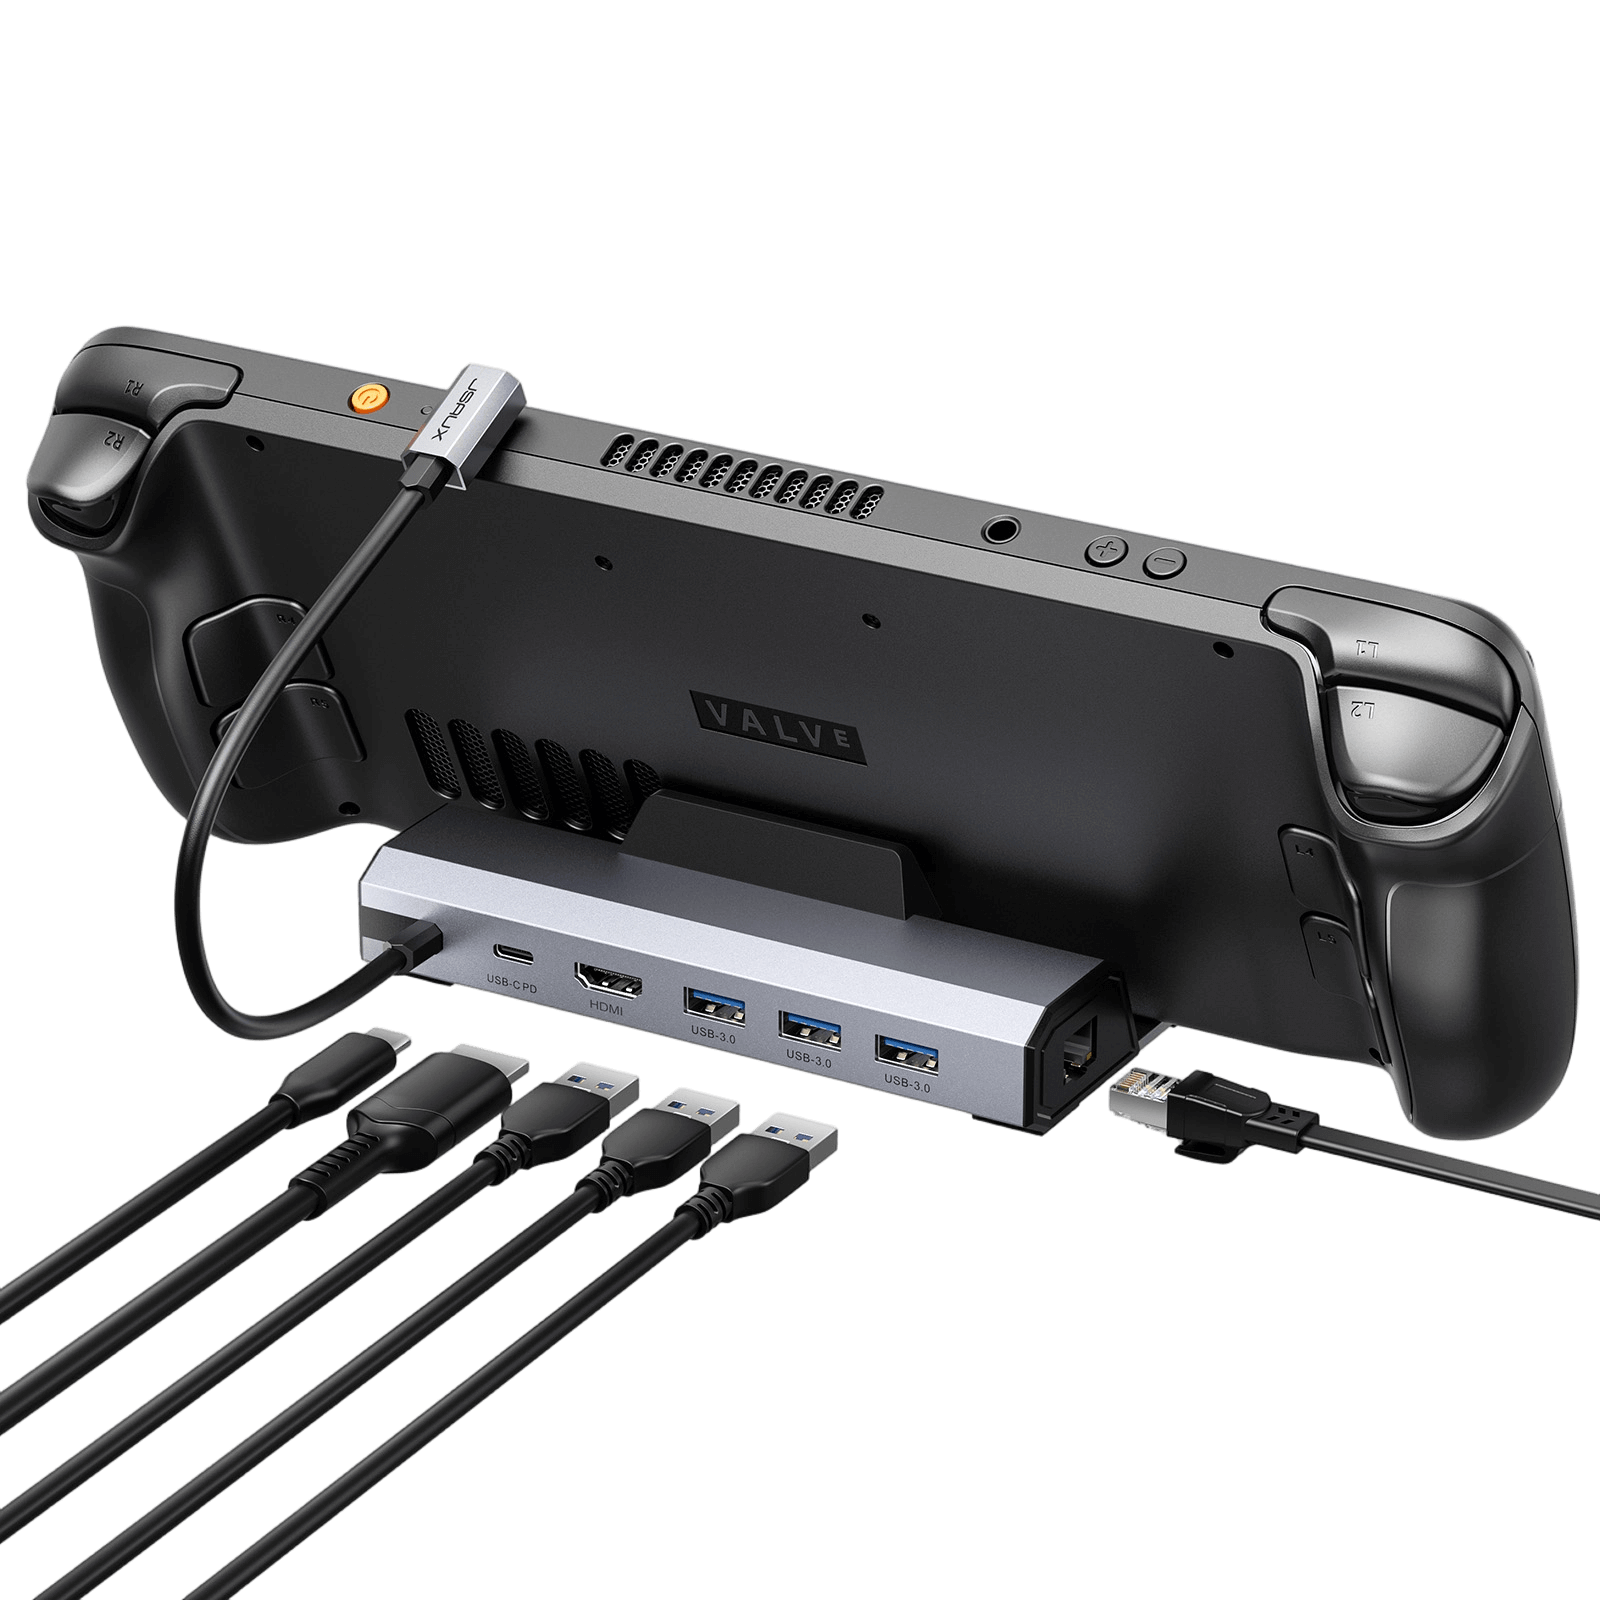
- 【升级版六合一扩展坞】 :配备 HDMI 2.1 4K@120Hz 输出,带来超流畅、清晰的视觉体验,支持 100W PD 快充,拥有 3 个高速 USB-A 3.0 接口和一个超高速千兆以太网接口。现已支持 ROG Ally X 和 Legion Go S,让您以更多方式享受无缝的大屏游戏体验。注意:不适用于 ROG XBOX Ally / XBOX Ally X。
- 【4K@120Hz HDMI 输出(升级版)】 :相比之前的 4K@60Hz 版本,刷新率提升一倍。无论您是在进行在线对战还是观看电影级过场动画,都能在外部显示器上享受流畅的游戏体验和更少的画面撕裂。
- 【100W 全速充电】 :支持高达 100W 的 PD 快充,轻松为您的掌机提供 Turbo 模式的强劲动力。让您的游戏体验不间断——即使长时间畅玩也无需担心电量耗尽。注意:ROG Ally 的 30W Turbo 模式完全支持,但建议使用 100W 充电器。
- 【千兆以太网】 :使用千兆以太网提升您的游戏体验,实现流畅的在线游戏、快速更新和文件传输。享受闪电般的下载和上传速度,消除延迟和卡顿,确保游戏过程不间断。
- 【扩展设备兼容性】 :现在支持 Steam Deck LCD/OLED、ROG Ally / Ally X、Legion Go / Go S 和 MSI Claw,使其成为跨多种掌机的一体化解决方案。注意:不适用于 ROG XBOX Ally / XBOX Ally X。
FAQ
PC0106 RGB — Q1: Why is there only one crystal color and no other colors?
A1: Only one color is currently available. Due to the RGB light effect, only the crystal shell can completely pass through, and the shells of other colors can only pass through part of the light, resulting in poor light effect.
PC0106 RGB — Q2: Can its RGB lighting effects be controlled only by buttons? Is it possible to set it up directly through the Steam deck?
A2: Yes, for the control of RGB lighting effects, the solution we currently provide is indeed controlled by physical buttons. Currently, it is not possible to set it directly through Steam Deck, but this design ensures that you can control the lighting effect conveniently and quickly at any time, regardless of whether Steam Deck is running or not.
PC0106 RGB — Q3: Will its RGB lighting effect consume the battery of the Steam deck and affect the usage time?
A3: The RGB lighting has a built-in 150mAh lithium battery, please rest assured that it will not consume the power of the Steam deck itself when in use.
PC0106 Vents — Q1:Will the open hole affect the original air duct of the original case, resulting in reduced cooling effect?
A1: Please do not worry, we specially considered the effect on the Steam Deck air duct when designing this transparent case.
The position of the opening is carefully selected to directly align with the air intake of the fan, which can shorten the air flow path and increase the air circulation speed, thereby accelerating the heat dissipation process. This design helps to remove the heat from the surface of the heat-conducting copper tube inside the Steam Deck faster, improving the operating efficiency of the device.
In order to keep the original heat dissipation air duct of the equipment unaffected, we used pre-cut silicone grease inside, and reserved a place for the original air intake. This ensures that the function of the original air intake is not disturbed, thus ensuring the air flow inside the device.
PC0106 Vents —Q2: Will dust get in after opening the hole in the back of the Transparent Back Plate ?
A2: Please do not worry, we installed a 50-mesh dust filter on the fan to cover the hole, which can prevent dust particles with a diameter of about 300 microns.
This mesh is typically used to keep larger airborne particles such as dust, pollen, and other impurities from entering the fan area while ensuring good airflow and cooling.
In addition, we also recommend that you clean the dust filter regularly and avoid using it in a dusty environment.
PC0106 Vents — Q3: Can it be used together with a protective case?
A3: The perforated design behind the clear case is precisely designed to maximize air flow, thereby effectively dissipating the heat inside the device.
If Using with other protective cases and silicone cases, etc., may block these cooling vents, interfere with the thermal management of the device, and may reduce the performance of the device.
Therefore, we recommend that you use this clear case alone to get the best Excellent device protection and heat dissipation.
FAQ
Q1. What should I do if the back buttons (R4, R5, L4, L5) cannot be pressed after I replace the back plate?
A1.After installing the button, first, check whether there is a gap between the button and the buckle and whether it can be pressed and rebounded normally.
If there is a gap that can be pressed and rebounded normally, continue to install.
If there are no gaps, proceed as follows:
1) Loosen the button screw for 2-3 turns. This method can make the space inside the button bigger, but it will make the whole button feel loose.
2) Add a gasket of M3 or M4 size to the yellow nut (the size of the gasket is about 5-6mm in outer diameter, 3.2mm in inner diameter, and 0.5mm in thickness. You can also trim a gasket with harder cardboard according to this size) , this method increases the pressing space at the other end by raising the nut.
3) Slightly loosen the back cover screws near the stuck button for 2-3 turns. For example, if R4 will be stuck, loosen the three screws closest to R4. This method can increase the pressing space, please be careful not to screw it too loosely.
2. Check if there is a gap at the top, because the gap is caused by deformation, and deformation may also cause the button to get stuck.
If there is no gap, continue with the installation. If there is a gap, remove the thermal grease and reinstall it.
Q2. After changing to a back plate, can it still be fit with a protective case?
A2. The transparent case is the same size as the original back cover. If you choose a lower or medium button , it is compatible with all JSAUX protective cases.
Q3. Is it normal for the thermal grease to get hot?
A3. That is normal, the thermal grease conducts heat from the Steam Deck circuit board. In addition, because the aluminum itself has good thermal conductivity, it will be hotter than other areas when touched, so be careful not to touch it to avoid being burned.
If you still feel too hot, you can also remove the inner thermal grease.
Q4. Will the thermal grease affect the original heat dissipation of the Steam Deck?
A4. It will not affect the original heat dissipation of the Steam Deck. Because the air inlet and outlet of the steam deck heat dissipation are separate heat dissipation pipes, and the thermal grease will not block the heat dissipation channels.
Q5. I replaced it with a jsaux’s button (medium or higher), can it fit in the valve carrying case/JSAUX case?
A5. It cannot be put into the original valve carrying case and JSAUX-BG0102 carrying case, but it can be put into JSAUX shoulder bag-BG0105 or carrying case-BG0106.
Q6. Why is the color of the product I received a little different from the picture?
A6. Actual colors may vary. This is due to computer monitors & screens displaying colors differently and everyone can see these colors differently.
Steam Deck LCD透明壳系列
Description
关于封面
- 清晰查看Steam Deck 的内部组件。
- 为喜欢动手改造的爱好者提供的DIY改造方案。
- 采用优质材料和配件,确保经久耐用,并带来高级质感。此外,还附赠一套完整的优质配件。
- 透明前盖与您的 Steam Deck完美贴合。
- 经过严格的测试流程,以确保其与 Steam Deck 的兼容性。
关于背板通风口
-
Steam Deck PC0106B 透明背板
Steam Deck PC0106 透明背板升级版 - 增强气流:增加进气口,缩短气流路径,显著提高散热性能。
- 改进的散热:由于采用了嵌入式铝制散热片,表面温度降低,从而确保外壳温度更低,并降低意外烫伤的风险。
⚠️注意:
- 透明前盖不建议没有DIY经验或电子设备拆卸经验的用户自行安装。如果您选择自行安装,我们强烈建议您仔细观看安装视频和阅读安装说明,或寻求专业人士的帮助。因拆卸蒸汽甲板而非本产品本身造成的任何设备故障,均由用户自行承担。
- 拧紧螺丝时,确保对准位置,切勿用力过猛。避免过度拧紧,以免变形,造成设备损坏。
FAQ
Q1. What should be paid attention to when disassembling the machine?
1. Replacing the cover of the Steam Deck involves a significant amount of work. The replacement process takes about 3-5 hours and is very difficult. We recommend that you find professional maintenance personnel to do it.
2. For information on changes to the overall device repair policy resulting from the disassembly, please refer to the official information provided by VALVE.
3. To minimize the risk of damage, please discharge the Steam Deck battery to below 25% before disassembly.
4. Before disassembling, please completely power off the Steam Deck and unplug all cables. Please follow the anti-static safety operation rules, such as washing hands before disassembling the device, wearing anti-static gloves, wearing clothes that are not easy to generate static electricity, and maintaining indoor humidity.
5. If you installed a Micro SD card, make sure to remove it before disassembling the Steam Deck.
6. If you use a screen protector on your screen, please remove the screen protector before disassembly.
7. Avoid touching other internal components of the device as much as possible. Please properly store the original parts and screws that have been removed.
8. For more detailed disassembly tutorials, please refer to the tutorial on the official website of JSAUX: https://jsaux.com/pages/pc0108-installation-tutorial
Q2. Is the front cover compatible with your PC0106 Transparent Back Plate?
A2. Yes
Q3. What is the difference between the PC0108 front cover and the original front cover?
A3. The PC0108 front cover is made of frosted translucent ABS+PC material, and the specifications and dimensions are the same as the original front cover.
Q4. After changing the front cover, can I still install the protective cover?
A4. Yes, the size of the PC0108 transparent front cover is the same as the original front cover, so the compatibility of the PC0108 is the same as that of the original Steam Deck cover, and both can support various types of JSAUX and third-party protective cases.
Q5. Is it normal for the front cover to see through light?
A5. Yes, the cover is transparent, and there are light-emitting elements inside the machine that can directly transmit light to the outside through the cover.
Q6. More questions about installation
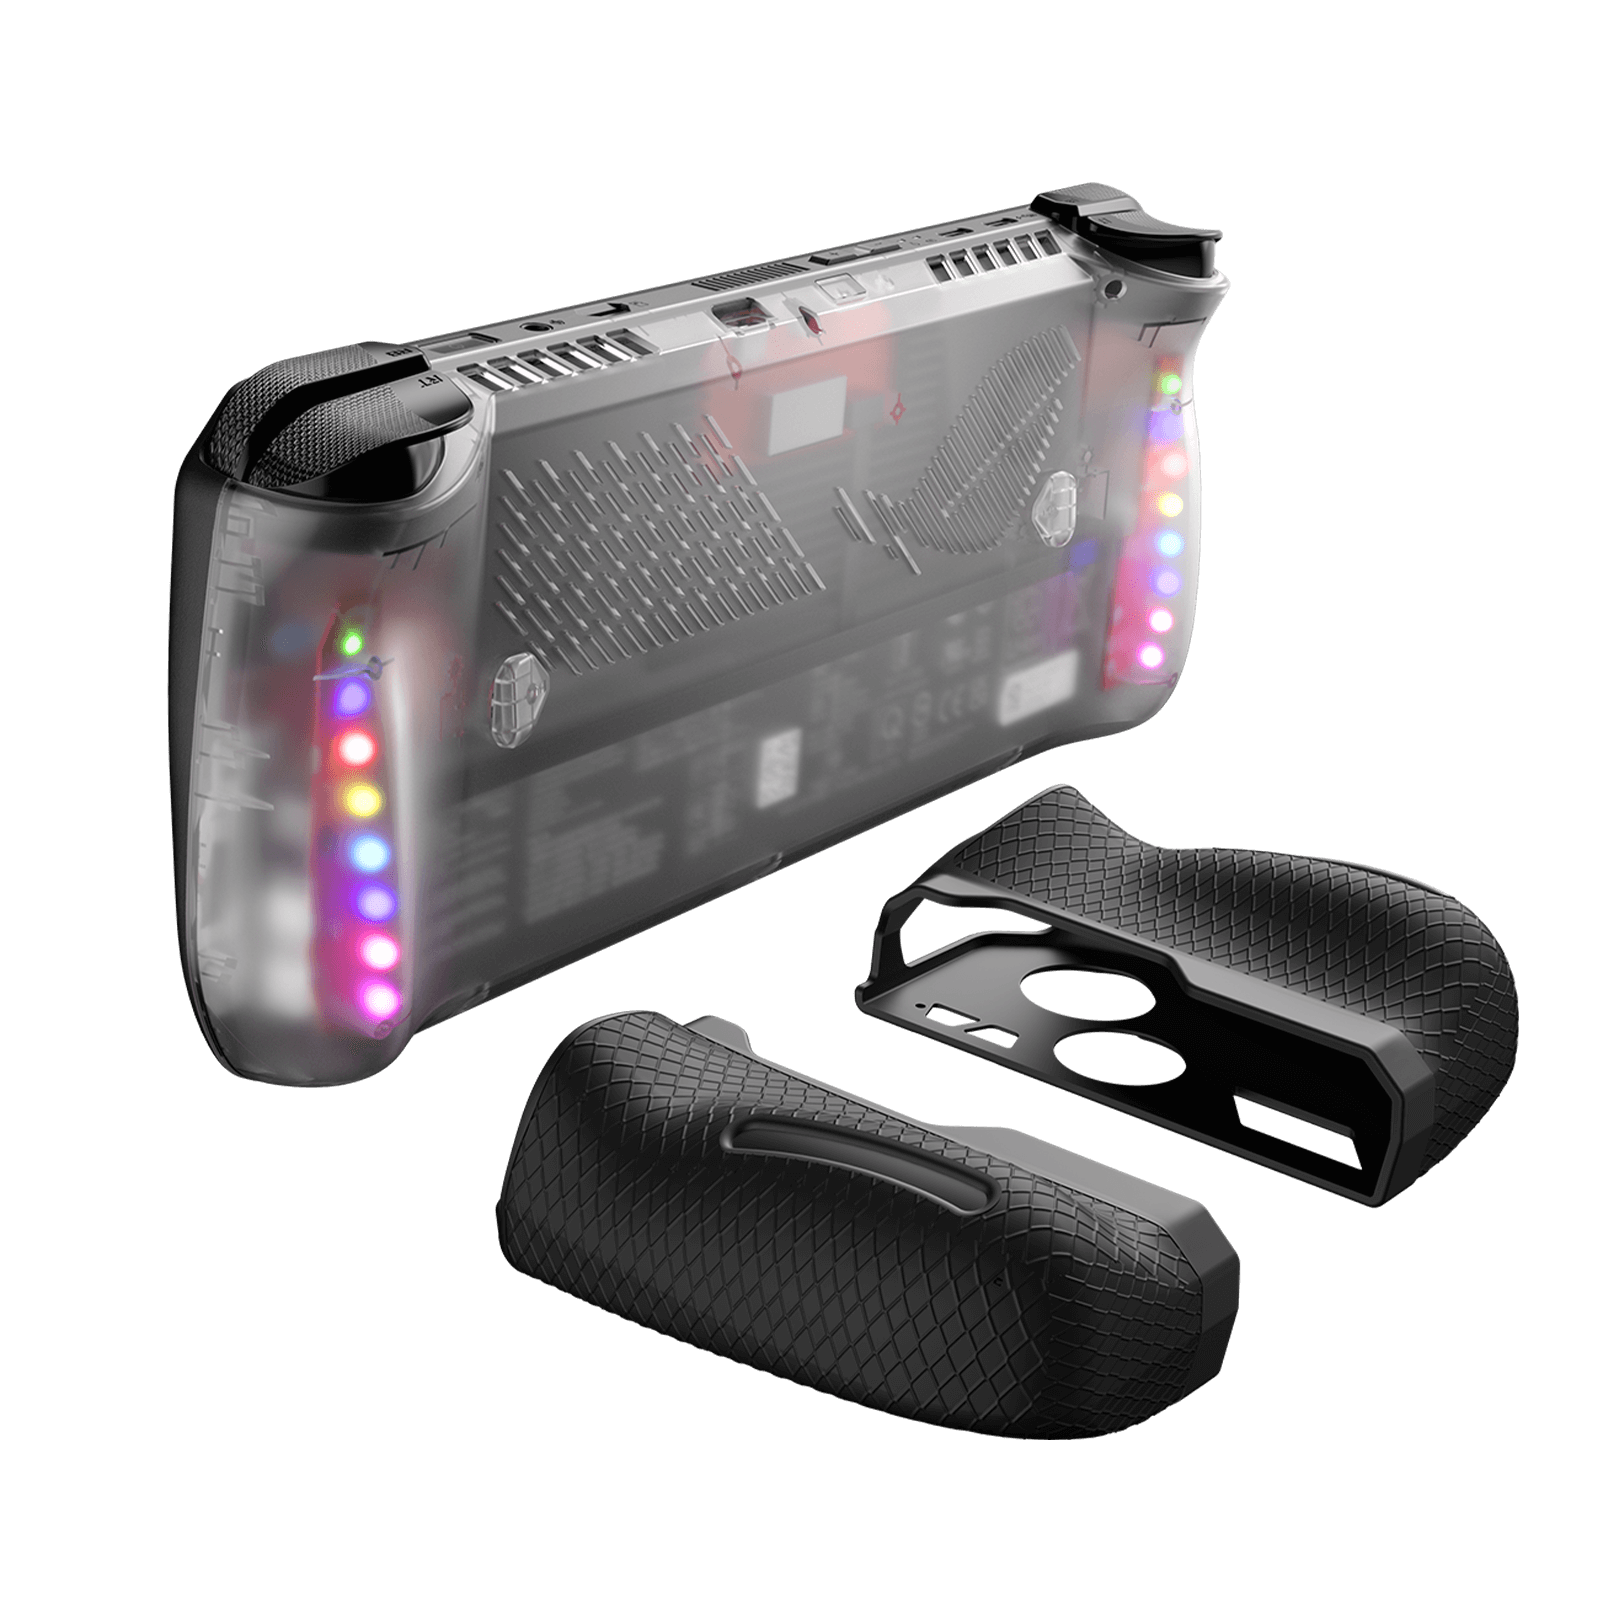
ROG Ally X RGB 透明背板
Description
- 【动态 RGB 美学】 :体验 6 种惊艳的 RGB 模式,将您的 ROG Ally X 变成一场视觉盛宴——包括彩虹渐变、彩虹波浪以及红色、绿色、蓝色和紫色呼吸灯效。
- 【优质透明外壳】 :采用优质PC材料制成,表面光滑无瑕,模压成型,外观时尚精致。
- 【定制黑色硅胶手柄套】 :随附的黑色硅胶手柄套(PC0113)与 ROG Ally X 的黑色机身完美搭配,柔化了 RGB LED 灯光,带来视觉上的愉悦和舒适的触感。
- 【增强型散热模块】 :铝合金散热模块提供更佳的散热性能,让您既能享受 RGB 灯光效果,又能享受高效散热,这与之前的型号需要做出取舍的情况截然不同。
- 【内置电池】 :充电25分钟即可为RGB灯效供电120分钟。支持边用边充电,可搭配充电器、支架或HB0609扩展坞使用,提升您的桌面体验。
FAQ
Q1. After disassembly and reassembly, the ROG Ally fails to power on.
A1: ● After reattaching the back cover, the ROG Ally requires activation through a power adapter to turn on.
● Ensure that the included black light-blocking sticker is properly adhered to the surface of the ROG Ally’s light-sensitive component.→
● The issue may be due to inadequate electrostatic protection measures or damage to the device’s components during disassembly. It is recommended to contact a repair technician for an assessment.
Q2. Is it compatible with the ROG Ally that has been upgraded with a 2280 SSD?
A2. We have tested the compatibility of certain 2280 SSDs with transparent backshells that come with RGB modules (without installing high heat sinks). Due to potential variations in modifications, there may be cases where components are covered. We recommend taking insulation measures or adjusting the RGB module based on the actual situation.
Q3. Can it compatible with the PC0201 Silicone Grip Case Set for ROG Ally?
A3. Yeah, they are compatible.
Q4. Is it compatible with PC0109 ModCase for ROG Ally?
A4. No, they are not compatible, the protective case may obstruct the light source behind the PC0110 back plate. And the switch of RGB light may be blocked.
Q5. Will installing PC0110 consume power from my ROG Ally?
A5: No, please donnot worry. Our product comes with a built-in 170mAh lithium battery, providing up to 3 hours of continuous RGB lighting without interruption and can be easily recharged via USB-C. Therefore, it will not consume any power from your ROG Ally.
Q6. What are the 4 transparent customizable slides in the packaging for, and how do I use them?
A6. The 4 transparent customizable slides included in the packaging are intended for customizing RGB patterns.
Video version installation tutorial: https://www.youtube.com/watch?v=d7MG3NSLaFU
- Usage Instructions:
1. Cut a piece of cardboard or any other material into your desired shape to be used as a paint mask.
2. Apply double-sided tape to the back of the paint mask, then affix it to the transparent customizable slide to secure it in place.
3. Spray black paint onto the transparent customizable slide, and allow it to dry for approximately 1 hour.
4. After the paint has dried, gently peel off the paint mask to complete your custom design.
Q7. Are there specific dimensions available for the transparent customizable slides?
A7. We provide a size guide for transparent customizable slides ( Download PSD file ). "Group 1" in the file contains all size specifications. You can add your desired graphics into it, hide "Group 1," and then export the image.
Q8. How do I qualify for the 6 free RGB Christmas slides?
A. Simply purchase PC0110 after 00:00 AM Pacific Time on Dec 8th will get them.
RGB 扩展坞
Description
- 【12合1 RGB扩展坞】:这款12合1 RGB扩展坞拥有12个功能接口,包括1个HDMI接口、2个USB-A 3.2接口、1个USB-A 2.0接口、1个千兆以太网接口、1个USB-C PD接口、1个3.5mm音频接口、1个TF卡槽、1个SD卡槽、1个USB-C输入接口、1个DisplayPort接口和1个USB-C 3.2接口。满足多种扩展需求,办公娱乐不受影响。(注:📢仅HB1201S/HB0801S具备游戏功能。详细对比请参考附图及“RGB扩展坞对比”部分。)
- 【6种RGB灯光模式】:这款RGB扩展坞配备RGB灯光,拥有6种灯光模式,包括直亮、呼吸、彩虹波浪、光谱循环、竞速循环和堆叠,可与您的桌面或其他RGB鼠标、键盘等完美搭配。通过USB-C上行端口连接到PC设备,并使用OpenRGB软件控制来调节各种RGB灯光效果。
- 【10Gbps 数据传输 & PD100W 快充】:这款 12 合 1 RGB 扩展坞配备 2 个 USB-A 3.2 接口和 1 个 USB-C 3.2 接口,确保您获得高达 10Gbps 的高速数据传输。此外,它还配备一个 USB-C PD3.0 100W 快充接口,支持最高 100W 的功率输入,可以快速为您的平板电脑、笔记本电脑和 Steam Deck 等设备充电,为您的所有设备提供可靠的电源。 (注意:📢USB-C 3.2 接口仅支持数据传输,不支持视频输出。)
- 【超高清4K输出和双屏显示】:这款12合1 RGB扩展坞配备HDMI和DisplayPort接口,最高支持4K@120Hz分辨率输出,可完美将屏幕镜像或扩展到高清电视、显示器或投影仪,打造影院级视觉体验。支持Windows系统双屏显示镜像和扩展模式(A-AA、A-BB和A-BC),并可支持MAC OS系统镜像模式(A-AA和A-BB)。
- 【广泛兼容性】:这款RGB扩展坞兼容Steam Deck/OLED、ROG Ally/X、Legion Go/2/S、ONE PLAYER、AYN Odin、AYANEO、Razer Edge、Logitech G Cloud、iPad、iPad Pro、手机等设备。📢注意:不兼容Nintendo Switch。
- 【包装内含】: HB1201 套装包含 HB1201*1、USB-C 转 USB-C 数据线*1、贴纸*1。HB0801 套装包含 HB0801*1、USB-C 转 USB-C 数据线*1、贴纸*1。HB1201S 套装包含 HB1201S*1、USB-C 转 USB-C 数据线*1。HB0801S 套装包含 HB0801S*1、USB-C 转 USB-C 数据线*1。(📢注意:包装内附带的 USB-C 数据线可能与图片所示略有不同,但不影响其正常功能。)
如果您需要调整 RGB 灯光效果,请前往OpenRGB 官方网站下载OpenRGB 0.9 版本。
注意: 📢
- 建议使用 100W 充电器,以便更好地体验 ROG Ally 的高性能 30W 模式。
- 通过 OpenRGB 软件打开关闭模式,所有 LED 灯都会熄灭;然后打开其他模式点亮 LED 灯;如果按住 Hub 触摸按钮 2 秒钟,所有模式都会关闭(需要按住两秒钟才能打开 Hub 灯光效果开关,然后可以通过 OpenRGB 调试其他模式)。
- 如果您在使用扩展坞时遇到任何操作问题,请确保您的 USB-C 数据线已正确连接到指定的“IN-USB-C”端口。我们强烈建议您使用随附的 USB-C 数据线连接设备,以确保最佳功能。如果您选择使用其他 USB-C 数据线,请确保其符合 USB-C 3.2 标准。
- 扩展坞上的接口标签可能与图片略有不同,但其功能保持不变,因此无需担心。
- RGB扩展坞仅兼容裸机ROG Ally X/Legion Go2/Legion Go S。
FAQ
Q1. Difference between 12-in-1 RGB Docking Station/8-in-1 RGB Docking Station:
A1.The main difference between the two products is the number of interfaces and parameters, as follows:
12-in-1 RGB docking station has 12 functional ports, including:1* HDMI port (4K@120Hz), 1*DisplayPort(4K@120Hz),2*USB-A 3.2 (10Gbps ), 1*USB-A 2.0(480Mbps ),1*Gigabit Ethernet port, 1*USB-C PD port, 1*3.5mm audio interface,1*IN:USB-C,1*TF card slot(480Mbps), 1*SD card slot(480Mbps) and 1*USB-C 3.2 port(10Gbps ,!!Only supports data transmission and does not support video output).
8-in-1 RGB docking station has 8 functional ports, including:1* HDMI port (4K@120Hz), 2*USB-A 3.0(5Gbps), 1*USB-A 2.0(480Mbps),1*Gigabit Ethernet port, 1*USB-C PD port, and 2*USB-C port(5Gbps ).
Q2. How to open and retract the bracket?
A2. 1. Please slightly press the middle part of the bracket, then the bracket would eject automatically, which could be adjusted to the proper size for your device.
2. When the bracket needs to be retracted, press the middle part of the bracket again.
Q3. Does this dock work with Switch?
A3. No, it is incompatible with Switch.
Q4. What is the standard of USB-C to C cable enclosed?
A4. The USB C-C cable reaches USB 3.2 standard, which maximum supports 10 Gbps and 100W charging.
Q5. How to customize my lighting effect?
A5. To use OpenRGB to customize RGB lighting effects, please follow the steps below:
Step 1, start the OpenRGB software on your Windows or Linux device.
Step 2, Connect the JSAUX RGB Dock to your device using the provided USB-C cable. Make sure to connect it to the "IN: USBC" port.
Step 3, click "Rescan Device" in the software to detect and load your dock. Once loaded, you will see your dock information displayed in the upper left corner of the software window, such as "JSAUX RGB Docking Station.
Step 4. Navigate to the "Mode" section to choose from different RGB light effect modes. Available modes typically include "Direct", "Breathing", "Rainbow Wave", "Spectrum Cycle", "Stacking" and "Race Cycle".
Step 5, you can adjust the speed, direction, and brightness of the selected light effect according to your preference. Experiment with these settings until you achieve the desired RGB lighting customization.
Q6. Why cannot I enable VRR with my docking station?
A6. The docking station supports VRR function. But the performance and effectiveness of the VRR function are influenced by several factors:
●Display Compatibility: Your monitor must be VRR-compatible, supporting technologies like NVIDIA’s G-Sync, AMD’s FreeSync, or HDMI 2.1’s VRR.
●Device and Graphics Card Support: Ensure that both your device and graphics card are VRR-capable and that all drivers are up-to-date for optimal functionality.
●Connection and Cables: Use the appropriate connection interface (e.g., DisplayPort 1.4, HDMI 2.1) and high-quality cables to facilitate effective VRR.
●Refresh Rate Requirements: VRR often requires specific refresh rates, such as 4K120Hz or 2K120Hz, to function correctly.
●Game Compatibility: Not all games support VRR. Some may need updates or specific settings adjustments to enable this feature.
●Dual Display Limitation: VRR is not supported when using dual display mode.
Please note that the VRR function may currently exhibit varying levels of stability with some handheld and may not be fully compatible with all types of monitors.
We are committed to improving this feature and recommend checking compatibility with your specific devices for the best experience.
Q7. Why can’t my ROG Ally turn on the 30W mode when connected to HB1201/HB1201S/HB0801/HB0801S using the charger (65W) provided with ROG Ally?
A7. If you encounter this situation, it is recommended that you try to use a 100W charger to connect.
五合一扩展坞
Description
- 【升级版五合一扩展坞】 :配备 HDMI 2.1 4K@120Hz 输出,带来超流畅、清晰的视觉体验,支持 100W PD 快充、双 USB-A 2.0 接口以及可靠的以太网连接。现已支持 ROG Ally X 和 Legion Go S,让您以更多方式享受无缝的大屏游戏体验。注意:不适用于 ROG XBOX Ally / XBOX Ally X。
- 【4K@120Hz HDMI 输出(升级版)】 :相比之前的 4K@60Hz 版本,刷新率提升一倍。无论您是在进行在线对战还是观看电影级过场动画,都能在外部显示器上享受流畅的游戏体验和更少的画面撕裂。
- 【100W 全速充电】 :支持高达 100W 的 PD 快充,轻松为您的掌机提供 Turbo 模式的强劲动力。让您的游戏体验不间断——即使长时间畅玩也无需担心电量耗尽。注意:ROG Ally 的 30W Turbo 模式完全支持,但建议使用 100W 充电器。
- 【可靠的有线以太网】 :内置 RJ45 端口,可享受稳定一致的网络连接,确保低延迟性能,实现流畅的在线游戏和流媒体播放。
- 【扩展设备兼容性】 :现在支持 Steam Deck LCD/OLED、ROG Ally / Ally X、Legion Go / Go S 和 MSI Claw,使其成为跨多种掌机的一体化解决方案。注意:不适用于 ROG XBOX Ally / XBOX Ally X。
📢注意: 建议使用 100W 充电器,以便更好地体验 ROG Ally 的高性能 30W 模式。
FAQ
Q1. Why do SD cards become inoperable or unwritable?
A1. SD card format is not compatible with the Steam Deck system, you need to back up the SD card in advance and then format it to the correct format.
Q2. Does the docking station output video over a USB-C port?
A2. No, the USB-C port is for power input only.
Q3. Why does the flicker occasionally appear after I connect the Steam Deck to the monitor via Docking Station HB0602 for a period of time?
A3.After a long gaming experience, Steam Deck will enter a self-protection mechanism due to overheating. At this time, the occasional screen flicker is a mechanism of reducing the frequency of the screen, which is a normal phenomenon.
Q4. Some instructions for customers when setting resolution in desktop mode.
A4. 1. You can modify the resolution in desktop mode or game mode (Steam Deck version 3.3.2 and above)
2. It is recommended that after connecting the monitor, only the monitor should be used as the main playing screen, both "Enabled" and "Primary" under "Laptop Screen" should be unchecked.
This will provide a better gaming experience and also reduce the power consumption of the console screen.
3. If you need a split screen experience, we also recommend separating the two screens, otherwise, there will be a screen overlap situation.
(At present, due to Steamdeck system bug, so there is no way to split the screen to put the icons of two screens on one screen)
六合一扩展坞
Description
- 比较: HB0702S和 HB0603S 的主要区别在于 HB0702S 比 HB0603S 多一个 DP 端口。
-
建议使用 100W 充电器,以便更好地体验 ROG Ally 的高性能 30W 模式。
FAQ
Q1.How to ensure the output of 4K@60Hz?
A1. Please use HDMI to HDMI 2.0/2.1 Cable shorter than 15 feet in length and use as few cable adapters as possible. Then manually debug into desktop mode and set 4K@60Hz output. You also need to set it in-game if necessary.
Q2. Why do external devices such as mouse and keyboard not work well when docking?
A2. When you dock your Steam Deck, please connect your power adapter to provide sufficient power supply.
Q3. Why does thr Ethernet not work?
A3. After the SteamOS is upgraded, you need to manually enter the desktop mode and connect the wired network. Turn off Wi-Fi, or set the wired connection priority.
Q4. Why does the TV not recognize my sound barrier and deactivate the CEC device?
A4. In the Steam settings, click Audio, there is output, and click "External Devices", and the audio can be transmitted to the TV.
Q5. Why does my Steam Deck have a black screen and only display images on the monitor when I connect it to a monitor via an HDMI cable in game mode.
A5. This is a normal phenomenon in game mode. Currently, the only way to enable two screens is to reboot into desktop mode.
FAQ
Q1.What should I do when using HB0604 for the first time?
A1.We have partitioned and formatted the SSD before we shipped it, and you can use it directly after receiving the goods.(If you purchased the option with SSD)
Q2.What should I do if the hard drive/SSD is not recognized?
A2.If the SSD cannot be recognized after receiving the products, please open the cover of HB0604 after powering off to check whether the SSD is correctly stuck in the slot.
Please unplug the SSD and reinsert it into the slot. (Be sure to plug and unplug the SSD after the power is off, otherwise the SSD will be damaged!)
Q3.What advice do you have for using an SSD in desktop mode?
A3. As Steam OS system does not support automatic recognition of external SSDs after startup, so you need to click on the external SSD in the bottom right corner of desktop mode to "Mount and Open" it each time before the library file can be loaded in the game platform.
It is recommended to format the SSD first, enter the Steam platform and add the library folder, then download and use our provided auto-mount script so that the SSD will be automatically loaded every time the system is booted.
JSAUX technical team has prepared a script that will automatically mount the SSD after installation, please download it from the "DESCRIPTION".
Q4. Any suggestions for running games with HB0604?
A4.For games that have already been running on Steam Deck internal storage, it is recommended to re-update or download the game to the external SSD, because the background data of the games that are already running on this computer may still be stored on this computer.
If they are directly moved to the SSD, it may cause can not operate.
Q5. Why did not it automatically create a steam folder nor allow me to create as it is "read-only" when I click "mount and open"?
A5.The SSD/Hard Drive format partition needs to be "Readable" and "Writable". If it is set to "read-only", it cannot be operated the SSD/Hard Drive or download games.
Q6.After using the SSD automatic installation script, a password is required to run it. What should I do if I forget the password?
A6.When Steam Deck is purchased, the default password is 1234. If the password has been changed, you need to contact Steam Deck customer service to reset the password.
FAQ
Q1. Does the docking station output video via HDMI to DisplayPort cables?
A1. No, video output only supports HDMI to HDMI cable or DP to DP cable.
Q2. I wanted to know if it supports Multi-Stream Transport(MST) on the DP?
A2. MST connections are not supported currently. If you need to use multiple screens, we recommend connecting the HDMI and DP ports of the docking station to two monitors corresponding to the ports to achieve a multi-screen display.
Q3. What is the version of the DP protocol of HB0702 Docking Station?
A3. HB0702 Docking Station is DP1.2, the highest resolution/refresh rate of 4K@60Hz can be set by connecting an external display (HDMI or DP) through the HB0702 docking station. The monitor that comes with the Steam deck can be set to a resolution of 800*768.
Q4. Why do SD cards become inoperable or unwritable?
A4. SD card format is not compatible with the Steam Deck system, you need to back up the SD card in advance and then format it to the correct format.
Q5. Does the docking station output video over a USB-C port?
A5. No, the USB-C port is for power input only.
11 合 1 扩展坞

Description
- 11 合 1 USB-C 扩展坞:这款 USB-C 扩展坞包含千兆以太网、100W USB-C PD 快速充电、8K HDMI、8K DisplayPort、2 个 USB 3.0 端口、1 个 USB 2.0 端口、SD 和 TF 卡读卡器以及 3.5 毫米麦克风/音频端口。
- 单8K或双4K显示器扩展坞:使用DP和HDMI输出连接单个8K或双4K显示器。
- 稳定高效的传输:配备 2 个 USB 3.0 端口(5Gbps)和 1 个 USB 2.0 端口(480Mbps),可享受高速数据传输。内置 SD 和 TF 卡槽支持同时读取多张卡,速度最高可达 5Gbps。
- 千兆以太网和3.5mm麦克风/音频接口:支持1000Mbps以太网连接,使下载和运行游戏更快更稳定。即插即用,无需额外驱动程序。
- 100W 最大功率输出:可为您的平板电脑、笔记本电脑、Steam Deck、ROG Xbox Ally、ROG Xbox Ally X 和 ROG Ally 全速充电。(注意: 📢不兼容 AYA NEO 主机。无法保证 ROG Ally 的 30W Turbo 模式可用。根据目前的信息,可能需要 65W 以上的充电器。最终能否启用 30W Turbo 模式取决于所使用的具体充电器。)
- 广泛兼容性:该扩展坞可与大多数系统配合使用,并支持 Windows/Android/macOS/Linux 系统,确保与各种设备兼容。
注意📢:
- 如果遇到操作问题,请确保您的 USB-C 数据线已正确连接到“IN-USB-C”端口。我们建议使用随附的 USB-C 数据线以获得最佳效果。如果您选择使用其他 USB-C 数据线,请确保其符合 USB-C 3.2 标准。
- 随附的 USB-C 数据线可能与图片中所示的数据线有所不同,但这不会影响其正常功能。
- 建议使用100W 充电器,以便更好地体验 ROG Ally 的高性能 30W 模式。
FAQ
Q1. JSAUX Dock: Why & how different from other 11-in-1 models?
A1. Our products feature a DisplayPort as well as HDMI ports that support up to 8K resolution (backward compatible with 4K@165Hz/4K@144Hz/4K@120Hz) when used individually. In dual display mode, they can simultaneously output up to 4K@60Hz.
Q2. How does it work ?
A2. Laptops often feature just a USB-C port, necessitating the use of a multi-functional docking station. By connecting the docking station to the USB-C port, you can access a wide array of connections including Ethernet, HDMI, DisplayPort, and USB-A.
Q3. Can USB-C PD connect to other USB-C devices and transfer data?
A3. The USB-C PD interface is solely designed for device charging purposes and does not support data transfer. It is not intended to connect to other USB-C devices.
Q4. Is it capable of simultaneously reading TF and SD cards?
A4. Yes, but iPad Pro2020 interface restrictions, only single card read and write.
Q5. No video output detected when HDMI and DP ports are connected. What might be the missing component or issue?
A5. Troubleshooting steps:
1.Check proper HDMI cable connection to the display or PC’s HDMI port.
2.Ensure the use of an HDMI cable version 2.1 or higher.
3.Confirm connection of the PD charger to the product.
OmniCase 2 系列扩展坞

Description
- 【12合1存储扩展坞】: OmniCase 2 Pro 和 OmniCase 2 Lite+ 存储扩展坞拥有12个功能接口,包括2个HDMI接口(支持4K@60Hz)、1个USB-A 3.0接口(支持5Gbps数据传输)、1个USB-A 2.0接口(支持480Mbps数据传输)、1个千兆以太网接口、1个USB C-PD接口、1个3.5mm音频接口、1个TF卡槽、1个SD卡槽、1个DisplayPort接口(支持4K@60Hz)和2个USB C接口。终极12端口扩展坞,满足您的一切需求!
- 【电子收纳功能设计】:配备多种线缆和适配器,方便您取出并连接到您的设备,让您的科技生活更加轻松便捷。您将获得一根 USB-C 转 USB-C 3.2 线缆、一个 USB-C 转 USB micro-B 适配器、一个 USB-C 母头转 USB-A 公头适配器、一个 90° USB-C 母头转公头适配器以及一个取卡针。
- 【一体式磁吸设计】:我们创新的一体式磁吸设计确保您的设备之间连接顺畅。只需将它们靠近,磁力即可牢固吸附。您可以方便地随身携带。
- 【4K@60Hz 超高清 & 三屏显示】:通过我们的 HDMI 和 DisplayPort 输出接口,沉浸于惊艳的 4K@60Hz 分辨率,享受视觉盛宴。这款 12 合 1 存储扩展坞支持 Windows 系统的三屏镜像和扩展模式(A-AAA、A-BBB 和 A-BCD),并支持 macOS 系统的三屏镜像模式(A-AAA 和 A-BBB) 。📢注意:由于 macOS 的限制,苹果设备不支持 MST 模式。在扩展模式下,Mac 用户只能显示两种不同的内容。( 📢仅适用于 OmniCase 2 Pro)
- 【PD100W 快充 & 5Gbps 数据传输】:配备 USB-C PD3.0 100W 快充接口,支持最高 100W 功率输入,可快速为平板电脑、笔记本电脑和 Steam Deck 等设备全速充电,为您的所有设备提供可靠的电源。OmniCase 2 Pro 存储扩展坞提供 1 个 SD 卡槽、1 个 TF 卡槽、1 个 USB-A 3.0 接口、1 个 USB-C 3.0 接口和 1 个 USB-A 2.0 接口,确保您获得高达 5Gbps 的高速数据传输。
- 注意: 📢如果您在使用扩展坞时遇到任何操作问题,请确保您的 USB-C 数据线已正确连接到指定的“IN-USB-C”端口。我们强烈建议您使用随附的 USB-C 数据线连接您的设备,以确保最佳功能。如果您选择使用其他 USB-C 数据线,请确保其符合 USB-C 3.2 标准。
FAQ
Q1. Why are all the ports not working when I just received the docking station?
A1. Please make sure your device and docking station properly connected
IN: The USB-C port can only be used for connecting devices, not for charging.
PD: USB-C port can only be used for charging.
If you connected the charger to the IN:USB-C port, there will be a slow charging prompt.
Q2. What systems do OmniCase 2and OmniCase 2 Pro support?
A2. Windows/Android/MacOS/Linux systems are supported.
Q3. Can it charge and connect the laptop at a same USB C port?
A3. No.Each USB-C port has its own function and cannot be mixed.
For example,OmniCase 2 and OmniCase 2 Pro are equipped with two USB-C ports:
IN: The USB-C port is only used to connect your host device, and the PD: USB-C port is only connected to a charger to power the device. Maximum support for 100W power supply.
Note: OmniCase 2 Pro has one more USB-C 3.0 port than OmniCase 2.
This USB- C 3.0 port only for connecting other external devices such as handles, keyboards, external hard drives, etc.(please do not connect it to the host device/power supply)
Q4. What is the difference between OmniCase 2 and OmniCase 2 Lite?
A4.Both products are 10-IN-1 Docking Stations with the same 10 ports and parameters. The main difference lies in their appearance and design. OmniCase 2 comes with an Accessories Kit and Organizer and also a Magnetic Suction design.
Q5. What is the difference between OmniCase 2 Pro and OmniCase 2 Lite+?
A5.Both products are 12-IN-1 Docking Stations with the same 12 ports and parameters. The main difference lies in their appearance and design. OmniCase 2 Pro comes with an Accessories Kit and Organizer and also a Magnetic Suction design.
FAQ
Q1. What distinguishes the 8-in-1 USB-C Phone Docking Stand with Phone Holder from the 5-in-1 version?
A1. The primary distinction between the two docking stands lies in their interfaces and parameters:
8-In-1 USB-C Phone Docking Stand with Phone Holder includes:
1*HDMI port (4K@30Hz)
3* USB-A 3.0 ports (5Gbps)
1*USB-C PD port (supporting up to 60W)
1*3.5mm audio interface
1*USB-C port
1*TF card slot (5Gbps)
1*SD card slot (5Gbps)
5-in-1 USB-C Phone Docking Stand with Phone Holder includes:
1*HDMI port (4K@30Hz)
1* USB-A 3.0 port (5Gbps)
2* USB-A 2.0 ports (480Mbps)
1*USB-C PD port (supporting up to 60W)
1*USB-C port.
Q2. What is the maximum thickness of my phone case that HB0802 & HB0502 dock is compatible with?
A2. Please ensure that your phone case is less than 3mm thick so as to be compatible with this dock.
Q3. Is it possible to simultaneously read and write to both my TF card and SD card?
A3. In most cases, yes. However, for users of the iPad Pro 2020, due to the port limitations, only one SD card or TF card can be read at a time.
Q4. Can my Earpods be compatible with this dock?
A4. This dock supports the headset or earphone with 3.5mm interface.
Q5. Is the Microphone function supported?
A5.Generally, the Microphone function is compatible. However, due to the wide range of earphone and headset brands in the market, there may be cases where the Microphone function is not fully supported. Nonetheless, the audio playback function remains unaffected.
Q6. Is a PD charger included? How to achieve a 60W charging effect?
A6. PD charger not included, For optimal 60W charging, use a fast charging cable and charger supporting 60W with PD protocol.
Q7. I used a PD 20w charger to charge my mobile phone, but the charging speed does not reach the expectation, any advice?
A7. The dock is capable of connecting multiple external devices such as hard drives, USB disks, keyboards, mice, and monitors, requiring a power consumption of 5w to 8w.
However, the actual charging power for your phone is only around 8w to 10w. We recommend using a charger with a power rating of 20w or higher for optimal performance.
Q8. Is Samsung DeX function supported?
A8.Sure, once you have connected your Samsung mobile to the dock, simply activate DeX on your phone.
Steam Deck LCD 和 OLED 的 ModCase
Description
- 完整灵活:该配件包括一个带金属支架的保护后盖、一条用于连接其他配件的绑带,以及一个在 Steam Deck LCD 和 OLED 闲置时使用的前盖。
- 完美贴合:模块化外壳的开孔与手持设备的输出/输入端口完美对齐。
- 极致保护:采用环保PC-ABS和硅胶材质,有效防止屏幕刮花或破裂,即使将Steam Deck/OLED放在背包或手提包中携带也安全无虞。边缘的TPU包边可缓冲跌落冲击,降低潜在损坏。
- 多多益善: JSAUX ModCase 的后盖上还配备了模块化滑轨。添加其他兼容配件,例如 JSAUX 散热风扇,即可提升您的游戏体验。
兼容:
- GP0200 散热风扇:这款小型散热风扇通过增加设备通风口的气流,可将 Steam Deck 的温度降低高达 18ºC。此外,它不会产生负压。该风扇可与 ModCase 套装一同购买,也可单独购买。
- 11合1扩展坞HB1101:支持4K@120Hz,配备HDMI 2.1 + DisplayPort 1.4接口、SD/TF卡槽,充电时可提供100W功率。它不仅是Steam Deck最强大的扩展坞,也是优化PC所有接口使用率的绝佳助手。
- M.2 SSD 卡保护盒 HB0100:使用合适的保护盒保护您的 M.2 SSD 卡免受灰尘和碰撞。适用于 2230、2242、2260 和 2280 型号的 SSD 卡。
- PB6501移动电源: 65W高速充电,20000mAh大容量,智能显示。(注:部分国家和地区暂不销售,请查看常见问题解答了解可销售国家和地区。)
- 保护壳专用粘胶片:使用粘胶片将您喜爱的第三方配件牢固地粘贴到保护壳背面的凹槽中。(注意:必须与PC0104保护壳配合使用)
📢备注:
- 当散热风扇电量耗尽并连接充电线时,默认会以最低风速运行且无法调节。如需开启最高风速,必须先将其关闭,然后再重新开启。
- 对于集线器套件,随附的 USB-C 线缆可能与图片中所示的线缆有所不同,但这不会影响其正常功能。
FAQ
Q1. Is PC0104 case compatible with all JSAUX docking stations and official docking stations?
Q1. The PC0104 case is compatible with all JSAUX docks , but not with official docks.
Q2. After changing to a back plate, can it still be fit with a protective case?
A2. The transparent back plate is the same size as the original back cover. If you choose a lower or medium button , it is compatible with all JSAUX protective cases.
Note: if the SD with jsaux back plate wears a protective case, which would cause the SD to accumulate heat so as to affect heat dissipation function of the back plate to some extent,(as most protective cases on the market do).
No worries, the SD primarily relies on copper pipes and fans for active cooling, so the impact will not be significant.
Q3. Will it fit in a JSAUX carrying bag or the official carrying bag?
A3. Yes, it will fit in any case without the cover, but only the BG0105 will fit in the case with the cover.
Q4. Is the fan noisy when in use?
A4. With regard to cooler fan noise, at a distance of 25cm from the cooler fan,
When the fan is at half speed, the noise level: 44-46DB
When the fan is at maximum speed, the noise level: 48-50DB
At a distance of 15cm from the fan,
When the fan is at half speed, the noise level: 44-48DB
When the fan is at maximum speed, the noise level: 50-53DB
Q5. Why can not I purchase the Power Bank Kit & Ultimate Kit?
A5. Due to the limitations of the logistics provider, the Power Bank Kit & Ultimate Kit can only be shipped to the following countries and regions(we are still looking for a better solution), we are sorry for the inconvenience.
USA / UK / Germany / Austria / Canada / Belgium / Czech Republic / Denmark / Estonia / Spain / Finland / France / Greece / Hungary / Italy / Lithuania / Luxembourg / Netherlands / Poland / Sweden / Slovenia / Slovakia / Portugal / Latvia / Bulgaria / Romania / Croatia / Ireland
Q6. What should I pay attention to when using adhesive sheet?
A6. 1. Clean the surface of the product to be pasted before using the adhesive sheet;
2. Do not pull hard immediately after pasting, it is best to wait for a period of time before fixed use;
3. The back glue of the adhesive sheet does not support electroplating, silicone, leather and other materials or other uneven product surfaces;
4. The maximum weight supported by the adhesive sheet is <300g and heavier products may fall off.
FAQ
Q1. Is this protective case compatible with Travel Cover of Modcase PC0104?
A1. Yes, Steam Deck with PC0105 is compatible with the travel cover.
Q2. Does this fit in the Valve carrying case?
A2. Steam Deck PC0105 is compatible with the Valve Carrying case.
Q3. Is Steam Deck with PC0105 compatible with JSAUX Docking stations?
A3. Yes, Steam Deck installed PC0105 is compatible with JSAUX Docking stations(HB0602/HB0603/HB0604/HB0702). Note: that PC0105 is NOT compatible with Valve dock.
Q4. How should I adjust the angle of the kickstand attached to PC0105?
A4. First, open the kickstand from the top side. Then, adjust the support frame to the groove and make sure it sticks properly without slipping.
Q5. Is it compatible with shoulder bag BG0105?
A5. The Steam Deck installed PC0105 can be put in BG0105
Q6. If my Steam Deck installed PC0105, can 180° USB-C Male to USB-C Female and USB-C Male to USB-A Female Adapter Set DD0009&DD0010 be connected perfectly?
A6. Yes, the design of the charging port in PC0105 is optimized and widened. Supports adapter connection perfectly.
ROG Ally 和 ROG Ally X 的 ModCase
Description
对于 ROG Ally X:
- 【全面保护】 :此配件包含一个带金属支架的保护背壳、一个用于连接其他配件的绑带以及一个在 ROG Ally X 闲置时使用的前盖。为您的 ASUS ROG Ally X 提供全面保护。
- 【终极保护】 :其环保的 PC-ABS 和硅胶材质可防止屏幕刮伤或破裂,确保背包或手提包的安全存放。TPU 边缘包裹可吸收冲击力,减少潜在损坏。
- 【面罩保护】 :ROG Ally X 闲置时,面罩可提供保护。新增四个便捷的 SD 卡存储插槽,让您的游戏存档和媒体文件井然有序。
- 【多功能捆绑和模块化设计】 :使用魔术贴将 JSAUX PB6501 移动电源等第三方配件连接到您的 ROG Ally X,提升游戏体验。ModCase 还配备模块化滑盖,可添加 JSAUX GP0202 散热风扇等兼容配件,进一步提升您的游戏体验。
- 【完美贴合】 :模块化外壳与华硕 ROG Ally X 兼容。精确的模块化外壳切口与手持设备的输入/输出端口完美对齐。
兼容:
RGB冷却风扇GP0202:
- 【双风扇精密散热】双风扇与 ROG Ally X 的通风口完美对齐,提供高效散热,从而提高性能并获得清晰的视觉效果。
- 【动态 RGB 照明】动态 7 色渐变照明为您的游戏设置增添身临其境的感觉。
- 【模块化设计,灵活性】轻松安装或拆卸风扇,以满足您的游戏偏好。
- 【可折叠支架,用途广泛】内置支架可实现手持模式和桌面模式之间的无缝转换。
- 注意: RGB 冷却风扇仅与 ROG Ally X (PC0111) 的 ModCase 兼容,不能与手持设备单独使用。
移动电源PB6501:
- 65W高速充电,20000mAh大容量,智能显示。
(注:部分国家和地区暂无发售,请查看常见问题解答了解发售国家和地区)
对于 ROG Ally:
- 【全面保护】 :此配件包含一个带支架的保护背壳、两条用于连接其他配件的绑带(长款和短款),以及一个在 ROG Ally 闲置时使用的前盖。为您的 ROG Ally 提供全面保护。
- 【终极保护】 :其环保的 PC-ABS 和硅胶材质可防止屏幕刮伤或破裂,确保背包或手提包的安全存放。TPU 边缘包裹可吸收冲击力,减少潜在损坏。
- 【面罩保护】 :ROG Ally 闲置时,面罩可提供保护。新增四个便捷的 SD 卡存储插槽,让您的游戏存档和媒体文件井然有序。
- 【多功能捆绑】 :使用魔术贴将第三方配件(例如 JSAUX PB6501 移动电源)连接到您的 ROG Ally,以获得极致的游戏体验。(两种魔术贴长度可满足不同需求。)
- 【完美贴合】 :模块化外壳与 ROG Ally 兼容。精确的模块化外壳切口与手持设备的输入/输出端口完美对齐。
- 【移动电源 PB6501 】65W 高速充电,20000mAh 大容量,智能显示。(注:部分国家和地区暂无销售,请查看常见问题解答了解可销售国家和地区)
注意📢:
- ROG Ally 的 ModCase 与 XG Mobile 外部 GPU 兼容。
- 与 ROG Ally 的 PC0110 RGB 透明背板不兼容。保护壳可能会遮挡 PC0110 背板后面的光源。并且 RGB 灯的开关可能会被遮挡。
- 与 DD0009 和 DD0010 180° USB-C 至 C 和 A 适配器套件不兼容。
FAQ
Q1. What is the angle at which the bracket can be opened?
A1. The maximum angle at which the bracket can be opened is approximately 65 degrees.
Q2. What is the maximum weight-bearing capacity of the fixed block on the back?
A2. The maximum weight capacity of the fixed block is approximately 5 KG.
Q3. Can the angle of the bracket be adjusted freely?
A3. No. The bracket can only be opened and avoid naturally close, and it cannot be adjusted to suspend at any angle. And the bottom magnet can secure the bracket onto the protective case.
Q4. Can ROG Ally with PC0109 modcase be put into Jsaux carrying case or Shoulder bag?
A4. 1. If you don not add a travel cover, it fits the BG0105A shoulder bag and BG0106A carrying case.
2. When the travel cover is mounted, only BG0105A shoulder bag can acommodate it.
Q5. Can I still install a travel cover on my ROG Ally after fitting the thumbstick cap?
A5. It would be compatible if the height of thumbstick cap is less than 3 mm.
Q6. Would it compatible with ROG XG Mobile?
A6. Yes.
Q7. Is it compatible with PC0110 RGB Transparent Back Plate for ROG Ally?
A7. No, they are not compatible, the protective case may obstruct the light source behind the PC0110 back plate. And the switch of RGB light may be blocked.
Q8. Is it compatible with Jsaux docks?
A8. Yes, it is compatible with Jsaux docks and adapters.
Q9. Can I just buy a travel cover or Fixed Block instead buying a whole kit of PC0109 ModCase for ROG Ally?
A9. No, the accs in the Basic set are sold together, the Basic set contains the following 4 pieces:
1.Protective Case
2.Travel Cover
3.Fixed Block with short velcro
4.Fixed Block with Long Velcro
But the PB6501 Power Bank in the Power Bank Kits can be sold separately
Q10. Why cannot I purchase the Power Bank Kits?
A10. Due to the limitations of the logistics provider, the Power Bank Kit & Ultimate Kit can only be shipped to the following countries and regions(we are still looking for a better solution), we are sorry for the inconvenience.
USA / UK / Germany / Austria / Canada / Belgium / Czech Republic / Denmark / Estonia / Spain / Finland / France / Greece / Hungary / Italy / Lithuania / Luxembourg / Netherlands / Poland / Sweden / Slovenia / Slovakia / Portugal / Latvia / Bulgaria / Romania / Croatia / Ireland
Q11. How to Properly Install & Remove the Protective Case of ModCase?
A11. For Install: Start by placing your ROG Ally gaming device underneath the protective shell, then secure the top part. Please note that during installation, the protective shell might slightly obstruct the buttons, and you may need to apply some force to ensure a snug fit.
For Remove: Begin by removing the protective cover from the top. It may be snug around the buttons, and you may need to exert some force to push it through the buttons. Then, remove the protective cover from the bottom.
Q12. Can the travel cover be used with thumbstick caps?
A12. We recommend using thumbstick caps with a diameter smaller than 18mm and a thickness less than 3mm.
Q13. How can I maintain the appearance of my white ModCase for ROG Ally if it starts to show signs of yellowing over time?
A13. Our white ModCase for ROG Ally may develop slight yellowing over time due to its material properties, which is a common characteristic of white cases. To help preserve its appearance, we recommend using alcohol wipes for gentle cleaning. While this may not completely eliminate the yellowing, it can effectively reduce its visibility and maintain the overall aesthetic appeal of your ModCase.
RingLax iPhone 15 系列保护壳
Description
- 【多合一】 :JSAUX iPhone 15 Pro 新款 RingLax 系列保护壳既可以用作支架,解放双手,又可以作为指环辅助握持手机,并且具有强磁吸力功能,满足崇尚无线充电的需求;采用军用级材料,使手机的保护能力进一步增强;
- 【免提支架】 :JSAUX iPhone 15 Pro 带支架的手机壳实现了支架的双位置 360 度旋转调节和 180 度旋转,此外还可以对垂直、水平等进行编程以定义更适合您的支架角度;支架采用更轻便耐用的碳钢材料,并与航空铝合金相结合,确保耐用性,同时增加支架的轻便性;
- 【指环支架无忧】 :带有指环支架的 JSAUX iPhone 15 Pro 手机壳可用于帮助握住和悬挂手机;例如,当您在床上看手机时,可以将手指滑过指环以增加手柄的稳定性并避免掉落;或者当您在试衣间时,您可以将手机挂在试衣间挂钩上; (📢注意:由于支架放置,MagSafe 钱包和 MagSafe 便携式充电器可能无法有效安装。)
- 【超强磁兼容 Mag-safe】 :JSAUX iPhone 15 Pro RingLax 手机壳兼容 MagSafe 充电器和其他 Qi 无线充电器。它采用环形结构,并采用独家 RingLax 磁环融合技术,使磁力比官方磁力强 3 倍,确保无线充电过程中几乎不会损耗电量,使充电更快、更安全,同时缩短整体充电时间,进一步提升您的无线充电体验。
- 【军规级防摔保护】 :RingLax iPhone 15 Pro 手机壳经过多次极限跌落测试,耐用性远超大多数普通手机壳。它还采用独家四合一一体式防震背板,并配备气囊缓冲功能,显著提升防护性能,让您的手机免受日常跌落和碰撞的伤害。镜头和屏幕位置采用特殊设计的凸起边框,有效防止镜头和屏幕刮伤;
- 【追求卓越体验】 :JSAUX RingLax iPhone 15 Pro 手机壳采用独立金属按键设计,带来与原装手机相同的按键触感;同时,半透明背板设计搭配柔软材质,让手机壳更时尚的同时,手感更舒适;
- 【气候承诺友好】产品拥有值得信赖的可持续性认证。 无碳认证确定产品的碳足迹,并通过减排项目抵消相关的碳排放。
FAQ
Q1. Why might the MagSafe Wallet and MagSafe Portable Charger not install properly?
A1. This is because the placement of the stand on the phone case may interfere with the proper installation of the MagSafe Wallet and MagSafe Portable Charger. The design of the stand could obstruct these accessories from securely connecting to the magnetic area on the phone case, thereby affecting their functionality.
掌上游戏机便携包
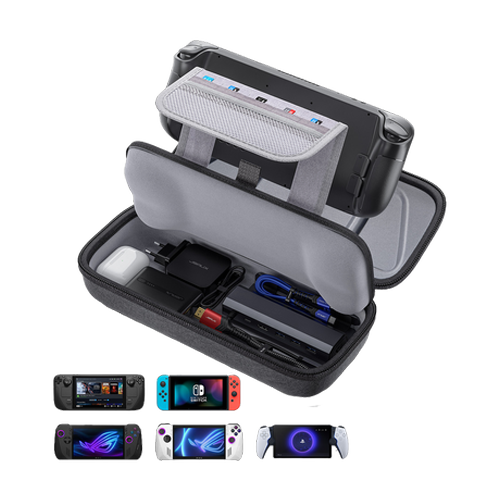
Description
- 【Steam Deck & ROG Ally 高效便携保护】:这款便携包专为 Steam Deck (OLED)、ROG Ally 和 ROG Ally X (2024) 设计,也兼容 Nintendo Switch 2 和 PlayStation Portal Remote Player,提供日常安全保护,坚固耐用。方便您收纳和携带。
- 【全新升级大容量】:内置扩展存储空间,可容纳更多配件。您可以同时放置原装AC充电器、扩展坞、小型移动电源、耳机等配件。无需取下保护壳,即可轻松放置Steam Deck或ROG Ally主机。另附赠一个SD卡盒,最多可收纳10张SD卡。一切井然有序。
- 【多重保护】: JSAUX ROG Ally X 手机壳采用加厚 EVA 外壳,可抵抗外部挤压,有效防止碰撞和跌落。凹槽设计,不会压迫手柄。内置绒布隔层,保护屏幕免受刮擦。
- 【双拉链设计】:拉链顺滑,使用时可轻松开合。良好的闭合性确保配件不会掉落。隐藏式链条,防锈美观。
-
【方便携带且固定】 :加固手柄,不易脱落。内部魔术贴绑带可牢固固定机身。您可以轻松地将这款Steam卡带箱携带到任何地方。
📢注意:
- 与 Switch 2 搭配使用时,这款保护壳最好搭配保护套使用。裸机在保护壳内可能会发生移位。
- BG0106X 与 Legion Go 不兼容。
FAQ
Q1. Does the original Valve docking station fit in the accessory section of the case?
A1. Yes, the original Valve docking station fits in the accessory section of the JSAUX Carrying Case.
Q2. Will this fit a steam deck with a silicon case on it?
A2. Yes, the JSAUX Carrying Case fits a steam deck with a silicon case on it.
Q3. Is this compatible with the raised back buttons from the Transparent Back Plate?
A3. If you do not put too much on the bottom layer, the raised back buttons will be compatible.
Q4. Is it compatible with the ModCase for Steam Deck PC0104?
A4. Yes, it accommodates Steam Deck with Modcase, but please note that if the travel cover added, it cannot be compatible.
掌上游戏机专用单肩包
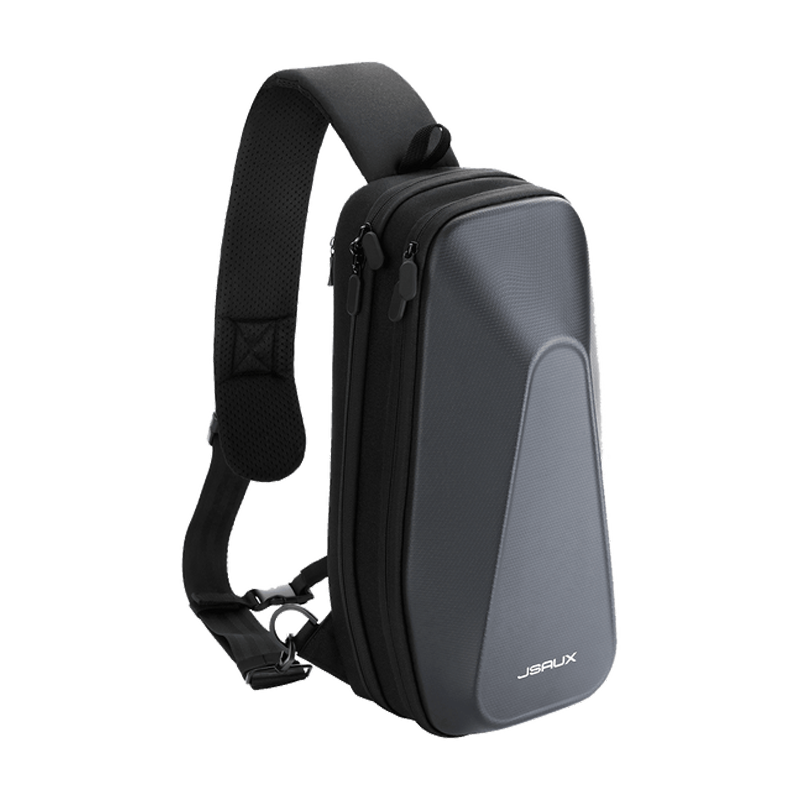
Description
- 适用于 Steam Deck、ROG Ally 和 Switch 2 的高效携带保护:我们的肩包 为您的 ROG Ally/X 和 Steam Deck/OLED 设备提供高效保护。专用隔层可有效防止刮擦和损坏。
- 智能存储解决方案:多层空间满足不同需求,包括专为 Steam Deck/ROG Ally 设计的独立舱室,以及用于存放不同尺寸物品的独立房间,例如 JSAUX Steam Deck 扩展坞、移动电源、AC 适配器、手机、USB 数据线、Switch 等。
- 功能设计,经久耐用:这款收纳包采用防晃动和阻力带设计,确保紧密贴合,防止液体溢出。优质牛津布和时尚的EVA硬壳兼具耐用性和现代感。
- 广泛兼容性——兼容Steam Deck/OLED、ROG Ally/X、Switch 2和PlayStation Portal。不兼容Legion Go。
FAQ
Q1. Can the Steam Deck be put into the storage bag after it has case?
A1. JSAUX Protective case (such as PC0101/PC0102/PC0103/PC0104/PC0105) can be put into the shoulder bag.
Q2. Can the net bag hold a water bottle?
A2. Mineral water bottles of up to 350ml are allowed.
Q3. Can the Steam Deck be put into the storage bag with the joystick cover on?
A3. Joystick covers with thickness less than 4mm can be put into the BG0105.
Q4. What size tablet can the net bag hold?
A4. BG0105 can hold iPad mini6 (about 8.3 inches).
FAQ
Q1. Does the Carrying Case for Steam Deck BG0102 fit the steam deck with the travel cover of the ModCase for Steam Deck PC0104?
A1. No, only shoulder bag BG0105 can store the PC0104 protective case with the cover on.
Q2. Will the bottom compartment hold the Valve dock together with the official original charger?
A2. No, the bottom compartment cannot hold the Valve dock and charger in the same space.
Q3. Does the bottom compartment of BG0102 accommodate the UK charger?
A3. No, the UK charger is not compatible with BG0102.
Steam Deck 防眩光屏幕保护膜
Description
- 保护您的 Steam Deck 屏幕:专为 Steam Deck 的 7 英寸显示屏设计,避免划痕、裂缝和其他类型的损坏。
- 防眩光,可视度更高:优质防眩光哑光纹理表面可减少眩光,提供清晰的体验。
- 轻松安装,完美贴合:告别安装过程中容易留下气泡或需要多次尝试的烦人步骤。屏幕保护膜自带导向框架,确保完美贴合,安装快捷方便。
- 防指纹超薄:采用哑光涂层,有效防止指纹和污渍。超薄设计提升游戏体验。0.33 毫米的超薄设计还能确保高灵敏度,带来更佳的游戏体验。
- 体验极致保护: Steam Deck 的显示屏不容小觑——这款高品质屏幕保护膜提供可靠保护。它拥有全屏覆盖和先进功能,是所有资深游戏玩家的终极配件。
- 📢注意:不建议将此防眩光屏幕保护膜用于 Steam Deck OLED,因为它可能无法与 OLED 屏幕配合使用。
FAQ
Q1. Steam Deck 512G paste the tempered film will affect the original anti-glare effect?
A1. Yes, if the Steam Deck comes with an anti-glare screen, and then we also apply the tempered film, it may make the original anti-glare screen not work. However, tempered film can still protect the screen from external damage (such as cuts, drops).
Q2. Is there an oleophobic layer?
A2. Yes
Q3. What should I do if there are white edges around the edges?
A3. Please try to press the bubble position together with a squeegee.
FAQ
Q1. Is there an oleophobic layer?
A1. Yes.
Q2. What should I do if there are white edges around the edges?
A2. You can try to press the bubble position together with a squeegee.
Q3. Is this product compatible with your protective skin GP0002?
A3. Yes, please install the protective glass GP0108 for the screen first and then install the skin GP0002.
Steam Deck LCD 和 OLED 屏幕保护膜

Description
- 专为 Steam Deck LCD 和 OLED 设计: 7 英寸钢化玻璃屏幕保护膜,全屏覆盖。
- 耐用性提高 5 倍:经过数小时的 500℃ 额外加固,比仅加固一次的其他普通屏幕保护膜耐用 5 倍。
- 超高清清晰度:我们的屏幕保护膜具有 99.99% 的透明度,为您提供原始清晰度,没有任何瑕疵。
- 卓越保护: 9H 硬度和额外加固使屏幕保护膜能够保护 Steam Deck LCD 和 OLED 的屏幕免受碰撞和刮擦。
- 防指纹:采用疏油涂层,JSAUX Steam Deck LCD 和 OLED 屏幕保护膜将让您的屏幕始终保持干净整洁。
FAQ
Q1. Is there an oleophobic layer?
A1. Yes
Q2. What should I do if there are white edges around the edges?
A2. You can try to press the bubble position together with a squeegee.
Q3. Why is the Steam Deck 512G version not responding to touch with the tempered film?
A3. The official 512G version of Steam Deck has a batch of machines due to the problem of curing the glue when making the screen bonding is not tight, there may be a broken touch after applying the tempered film.
Q4. Steam Deck 512G paste the tempered film will affect the original anti-glare effect?
A4. Yes, if the Steam Deck comes with an anti-glare screen, and then we also apply the tempered film, it may make the original anti-glare screen not work. However, tempered film can still protect the screen from external damage (such as cuts, drops).
FAQ
Q1. Instructions provided after receiving the parcel of Steam Deck anti glare screen GP0300.
A1.
1)After receiving the package, please promptly unpack it and carefully inspect the screen for any visible physical damage such as cracks, scratches, or breakage.
Tip:You can examine the anti-glare screen under different lighting conditions.
2)According to the item information provided in the USER GUIDE, thoroughly verify the quantity of the products received. If any accessories miss, please refrain from installing the GP0300 anti glare screen and contact JSAUX’s customer support for assistance asap.
3)Please strictly follow JSAUX’s installation tutorial for the anti-glare screen GP0300. Connect it to the Steam Deck as instructed, installation finished, power on the screen, and check the touch sensitivity and display to ensure proper functioning of the screen.
Q2.Is it the same as the original Steam Deck screen?
A2. The functionality of JSAUX anti-glare screen is the same as the original Steam Deck screen. With rigorous oversight by a reputable manufacturer, this screen ensures reliable quality assurance.
Q3.The protective film is covered with bubbles. Is this normal?
A3. The product is brand new. In order to ensure the quality and integrity of the screen product we provide to you, we conduct strict quality inspection procedures before it leaves the factory. Bubbles or smudges on the protective film, caused by the inspection process, are considered normal occurrences. The protective film is applied to safeguard the screen from scratches and dirt during transportation and testing. Upon receiving the package, you can peel off the film to inspect the screen for any damage. After inspection, you can reapply the film to continue protecting your screen during the installation process. Once the final installation is complete, you can remove the protective film and start experiencing the brand-new anti-glare screen!
Q4. Will there be a color difference between the anti-glare screen GP0300 and the original Steam Deck screen?
A4. No, the JSAUX anti-glare screen GP0300 has been strictly tested many times when manufacturing. The functionality of our anti-glare screen is the same as the original Steam Deck screen, and there is no color difference between the two.
Q5. Is this anti-glare screen a bare panel? Does the front side of the screen have a protective film?
A5. Yes, this is a bare panel. The front side of the screen is covered with a protective film, which should be gently peeled off before use.
Q6. More questions about installation.
ROG Ally X 硅胶握把保护套套装
Description
- 【兼容 ROG Ally X】 :智能机器切割精确,完美兼容 ROG Ally X。简约时尚的风格让您的 ROG Ally X 焕然一新
- 【防滑防摔保护】 :我们将 ROG Ally X 硅胶保护壳升级为防滑硅胶保护壳,提升手感和摩擦力,避免游戏时因手汗导致游戏主机滑落。提升游戏体验。即使您不小心将游戏主机掉落,这款 ROG Ally X 防滑保护壳也能提供完美保护。
- 【卓越握持设计】 :采用防滑纹理,显著提升握持体验。优化的卓越握持设计:采用防滑纹理,显著提升握持体验。优化的边缘设计,防止刮擦,同时提供舒适的触感。
- 【畅通无阻的散热】 :ROG Ally X 握把外壳的精密设计确保通风口的气流畅通无阻
-
【包装内容】 :此保护套专为 ROG Ally X 手柄设计,包装内含左右各一个硅胶保护套。注意:本产品不包含任何电子元件或 ROG Ally X 主机。为了获得更好的用户体验,建议使用不带摇杆帽的硅胶保护套。
FAQ
Q1. Will the Touch-sensitive Thumbstick Caps wear off its color?
A1. The Touch-sensitive Thumbstick Caps is made of conductive silicone, enabling it to trigger gyroscopes through capacitive touch. It contains conductive particles inside, and minor color fading is considered a normal occurrence.
Q2. Is it compatible with Thumbstick Caps?
A2. Due to the shorter length of the ROG Ally joystick, using Thumbstick Caps and silicone covers simultaneously may cause slight interference, requiring a bit more force to activate the joystick during operation.
Q3. What is the different between Touch-sensitive and Non-touch Thumbstick Caps?
A3. The Steam Deck utilizes capacitive thumbsticks, which can be activated by touch to control the gyroscopic aiming. Non-touch Thumbstick Caps cannot trigger the capacitive thumbsticks, affecting their ability to control the gyroscopic aiming, which serves as an aiming assist during gameplay.
Q4. Will the white silicone covers change color?
A4. It is completely normal for slight discoloration to occur after using white silicone covers for some time. The speed and extent of this change may be influenced by various factors, but rest assured, it will not affect their regular use.
To slow down the discoloration process, you may consider storing the grips in an area not directly exposed to sunlight and regularly cleaning them to prevent the buildup of contaminants.
FAQ
Q1. Can I buy the matching touchable thumb cap for GP0002 separately?
A1. Sorry, we do not sell touchable thumb caps separately.
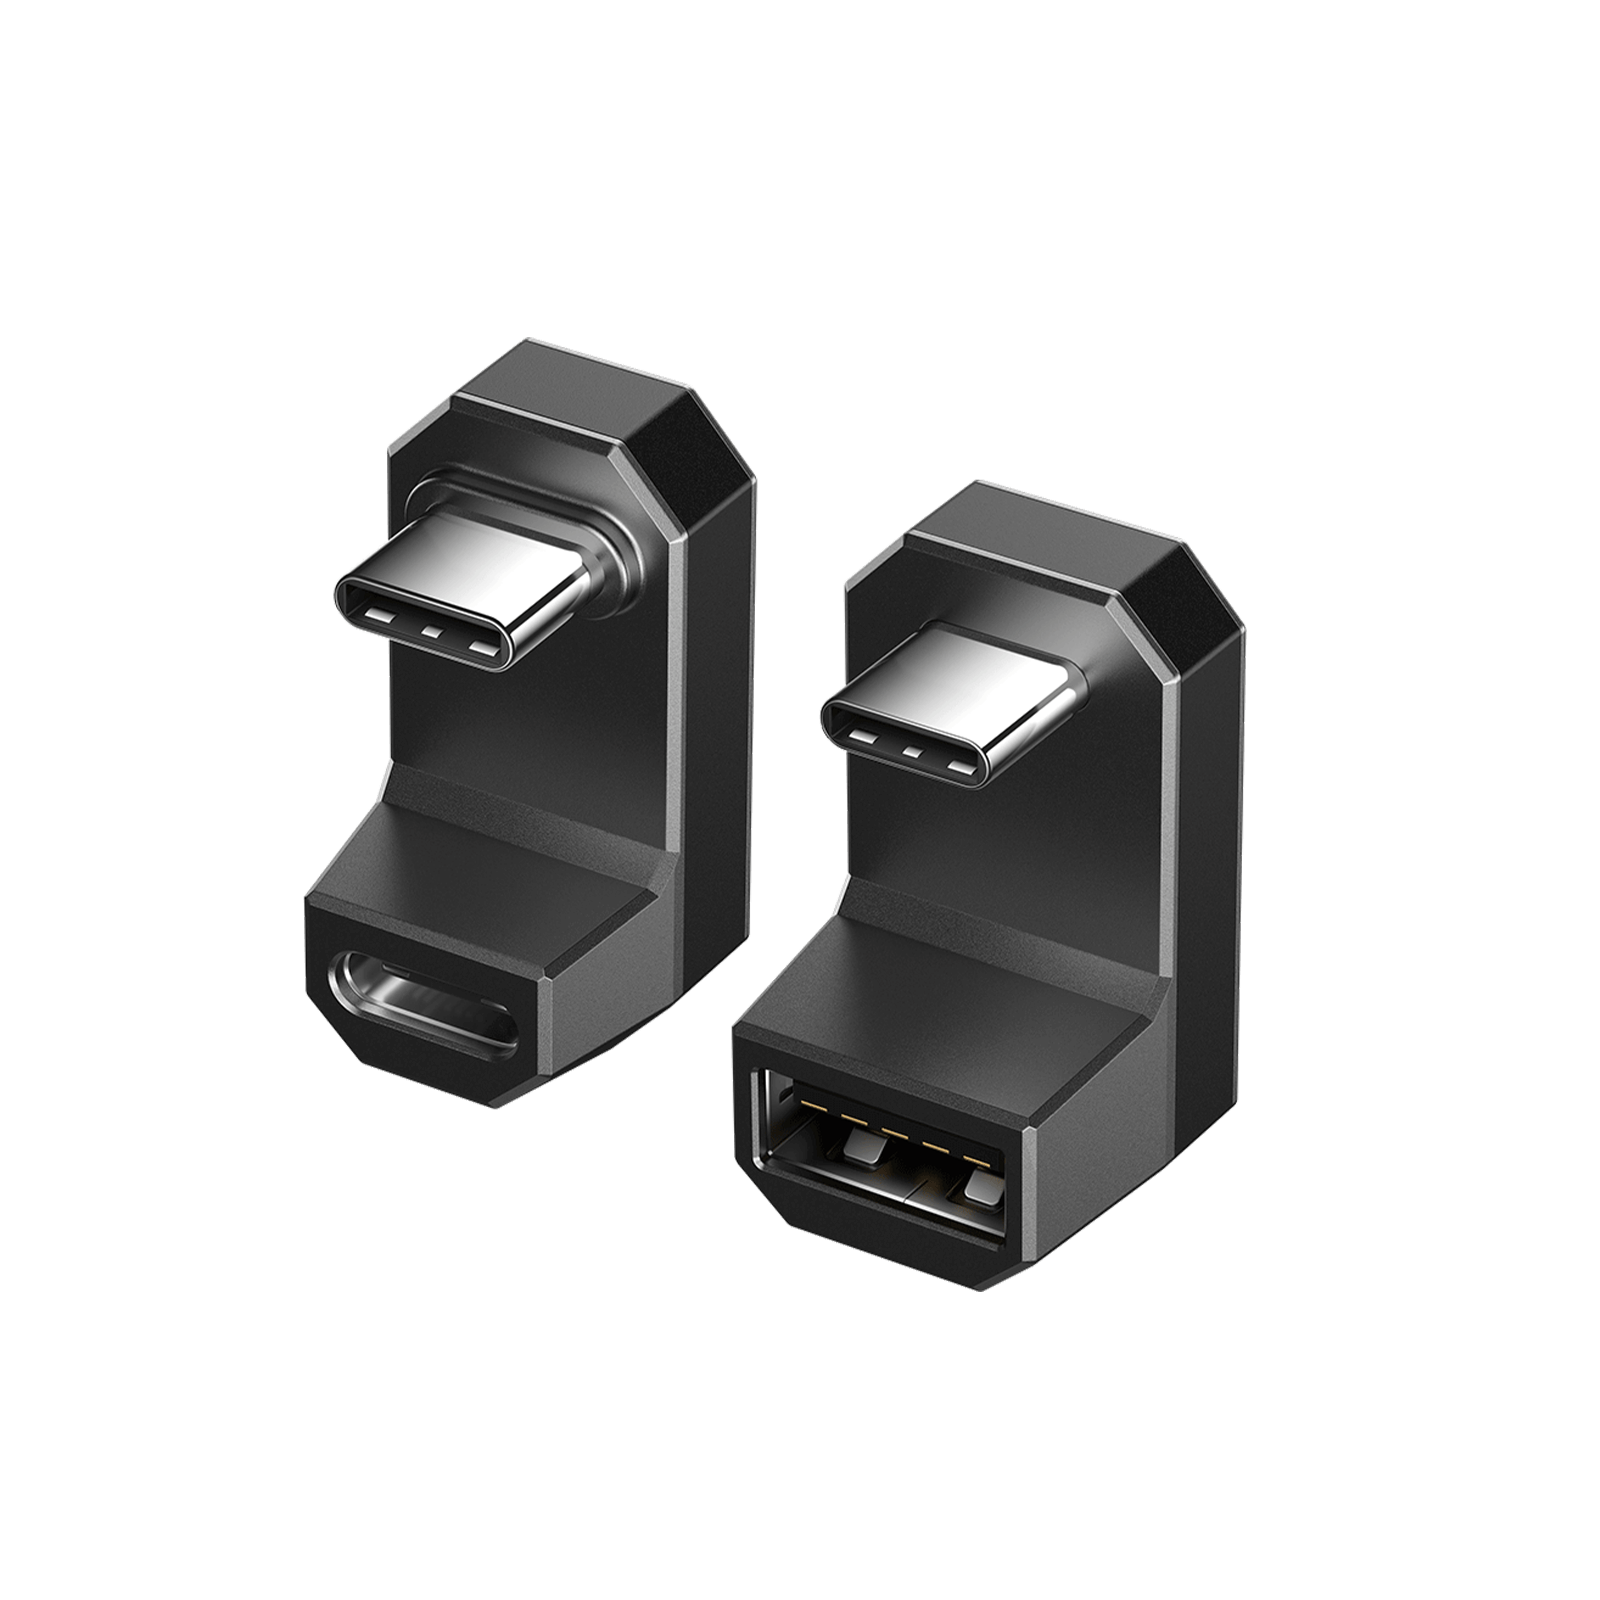
90° USB-C 转 USB-C 直角适配器
![Grey 2-pack 90 degree USB-C to USB-C right angle adapters #style_grey [2-pack]](http://jsaux.com/cdn/shop/files/90_-USB-C-to-USB-C-Right-Angle-Adapter-grey-1.png?v=1755238920&width=1600)
Description
- 【90度全功能数据传输】这款上下90度转接头可使线缆拥有合适的延伸方向,避免线缆和设备输入端口的磨损,并节省空间。支持充电和数据传输。
- 【100W 快充 & 40Gbps 传输速度】 JSAUX GAMING 直角 USB-C 适配器,最高输出电流可达 5 安培,为您的设备提供极速充电。数据传输速度高达 40Gbps。注意:您需要使用 Thunderbolt 3 或更高版本的线缆,并搭配 Thunderbolt 硬盘盒才能达到 40Gbps 的数据传输速度。
- 【4K@60Hz 视频输出】这款 USB-C 90 度延长线支持高达 8K 的视频信号和音频传输,可用于连接您的 USB-C 设备与另一台带有 USB-C 接口的显示器。注意:请确保您的输入设备和输出显示器都具有 USB Type-C 接口,并且支持视频输入和输出。
- 【品质保证】与其他直角适配器相比,我们采用优质铝合金外壳,更加耐用,有效防止内部芯片和电路损坏。防滑设计,方便插拔。
-
【兼容性】广泛兼容大多数Type-C设备。例如:Nintendo Switch 2 (2025)、ROG Xbox Ally/X、ROG Ally/X、Steam Deck/OLED、Legion Go/2、Switch、MacBook Pro、Surface Book 2、iPhone 16/16 Plus/16 Pro/16 Pro Max、iPhone 15/15 Plus/15 Pro/15 Pro Max、Samsung Galaxy S25/S24/S23/S22/S21/S20/S10、Note 20/10、LG G7/V20;Google Pixel、ChromeBook等。
FAQ
Q1. How to reach the fastest speed of data transfer?
A1. You need a Thunderbolt 3 or higher cable paired with a Thunderbolt hard drive case to achieve 40Gbps data transfer speeds.
Q2. What are the exact measurements of the outie plug’s collar?
A2. When plugged in, it is approximately 3/4".
Q3.Will this adapter fit in the cutout in jsaux’s kickstand case for the steam deck?
A3. Yes, the 90 Degrees Right Angle USB-C Male to USB-C Female Adapter fits in the cutout in jsaux’s kickstand case for the steam deck.
Q4. Can I use this usb c adapter to tansfer video to the monitor form my steam deck or switch?
A4. Yes, the USB-C 3.1 90-degree extender supports up to 4K@60Hz video signal and audio transferring for the connection between your USB-C devices to another monitor or display with a USB C interface. (Note: Please make sure both your input device and output monitor have USB type c port and support video input and output).
180° USB-C 转 C & A 适配器套装
Description
- 180度全功能数据传输:这款USB C转USB适配器采用创新的180度U形设计,让您在沙发或床上边充电边玩游戏、看视频和工作时更加方便舒适。重要提示:此180°适配器无法与宽度超过0.46英寸、厚度超过0.16英寸的外壳配合使用。
- 60W 快速充电和 10Gbps 传输速度:以快速的传输速度为您的设备提供最快的充电速度。
- 4K@60Hz 视频和音频传输: USB-C 3.1 180 度扩展器支持高达 4K@60Hz 的视频信号和音频传输,用于将您的 USB-C 设备连接到另一台具有 USB-C 接口的显示器或显示器。 (注意:请确保您的输入设备和输出显示器都具有 USB C 型端口并支持视频输入和输出)。
- 兼容性:广泛兼容大多数 Type C 设备。适用于 Steam Deck、ROG Ally、Switch、MacBook Pro、Surface Book 2、三星 Galaxy S22/S21/S20/S10、Note 20/10、LG G7/V20;Google Pixel、Chromebook 等。
- 您将获得: USB C 公头至 USB C 母头适配器 * 1,USB C 公头至 USB A 母头适配器 * 1。
笔记:
- iPhone 15 连接鼠标时需要开启辅助触控(设置-辅助功能-触控-辅助触控-已启用)。
- 与 AYA NEO 主机不兼容。无法保证 Rog Ally 能够使用 30W Turbo 模式。根据目前的信息,可能需要使用功率超过 65W 的充电器。最终,能否启用 30W Turbo 模式取决于所使用的具体充电器。
- 它不能与 PC0104 一起使用,因为 PC0104 的支架会阻挡连接到 180° USB-C 转 C & A 适配器套装的 USB 电缆
- 与 ROG Ally 的 PC0109 ModCase 不兼容。
FAQ
Q1. What about the compatibility with the ModCase PC0104 when the metal bracket is attached?
A1. If you use DD0009&DD0010 when the metal bracket is attached, one of the port of the adapter may be blocked by the metal bracket.
Q2. Can the JSAUX protective cases be supported?
A2. The DD0009&DD0010 is compatible with Steam Deck intalled PC0102/PC0103/PC0104/PC0105.
Q3. What should I be aware of the products when I am using it?
A3. Be sure that the adapter is attachted to the USB-C port of your device tightly, when it is properly attachted, there will be a little click sound from one of the ports of DD0009&DD0010.
Q4. Can DD0009&DD0010 be supported my Steam Deck installed protective cases of other brand?
A4. Only JSAUX cases be supported.
Q5. If I use Anti-Slip Stand for Steam Deck Dock SG0104 / Portable Stand for Steam Deck SG0101 /Anti-Slip Holder for Steam Deck SG0102, can this adapter work still?
A5. Yes, they are compatible with DD0009&DD0010.
FAQ
Q1. Why will my music stop when I unplug the power after charging?
A1. It is normal becausse the main control chip will be restarted if the power supply of the main board system is changed. Please set play music again.
Q2. What devices is this adapter compatible with?
A2. This adapter is compatible with almost any device with one USB-C port.
Q3.Can I use the volume buttons/call controls on my earphone cable with this adapter?
3. Yes, the adapter fully supports inline headphone controls.Note: Adapter does not support inline volume control on Apple’s earPods.
Q4. Will listening to music through this adapter affect charging speed?
A4. No, the adapter is designed for simultaneous audio streaming and PD fast charging. Listening to music will not affect charging speed.
FAQ
Q1. Does it support PD 3.0?
A1. Yes.
Q2. Can it be powered with the default 45W PD 3.0 charger that comes with the Steam Deck
A2. Yes, it can.
Q3. What HDMI cable should I use to support this adapter?
A3. HDMI 2.0
Q4. Can it be compatible with DD0009&DD0010?
A4. The USB-C port of HB0201 can be connected with the USB-C port of that adapter.
FAQ
Q1. Can it be used with the Nintendo Switch?
A1. No, it does not support the Switch.
Q2. Is the USB-C PD port compatible with other USB-C devices?
A2. Is the USB-C PD port compatible with other USB-C devices?
Q3. Why is there no laptop speaker sound after docking station connection?
A3. The docking station includes HDMI and 3.5mm audio/mic ports. HDMI connection to a display triggers laptop audio to switch. To use laptop speakers, on Windows 10 (similar on macOS), click speaker icon, select "Sound," and choose desired sound output.
65W 和 45W USB-C 折叠式充电器
Description
- 【Switch 2 电视模式供电支持】通过底座为处于电视模式的 Nintendo Switch 2 提供稳定、高输出的电源。注意:此充电器仅提供电源,不传输视频或 HDMI 信号。
- 【65W GaN 快速充电】这款 USB C 充电器采用先进的 GaN 技术,可提供高达 65W 的快速高效充电——非常适合笔记本电脑、平板电脑和游戏机等高需求设备,包括 Steam Deck、ROG Ally 和 MacBook。
-
【多功能旅行充电器】配备美规、英规和欧规插头适配器,支持在超过150个国家/地区充电。可折叠的美规插头和紧凑的设计使其成为随身携带和日常使用的理想之选。
附赠耐用型 6.6 英尺 USB-C 数据线:配备一根 6.6 英尺(2 米)长的编织 USB-C 转 C 数据线,支持 Power Delivery 3.0 和快速数据传输。加固设计,防缠绕,经久耐用。 - 【广泛兼容性 & 安全充电】兼容 Nintendo Switch 2、Switch OLED、Steam Deck、ROG Xbox Ally、ROG Ally、MacBook Pro/Air、iPad Pro、iPhone Air、iPhone 17/16/15 系列、Galaxy S25/S24/S23、Pixel 9/8/7 等多种设备。内置过压、过流和短路保护,充电更安心。
FAQ
Q1. What will the product I receive look like and why the charger is not compatible with my outlet?
A1. When you open the packet of the CH6504/CH4504, the EU adapter is defaultly attached to the plug. Please remove the EU adapter and choose the proper adapter you want.
Q2. What will the product I receive look like and why the charger is not compatible with my outlet?
A2. Yes, the charger CH4504/CH6504 can be put in the bottom room of BG0102.
Q3. Could it be placed in the Jsaux Carrying case BG0106?
A3. Yes,CH6504/CH4504 can be put in the bottom space of BG0106.
Q4. What is the difference between CH4504 and CH6504?
A4. The 65W charger and the 45W charger are only different in charging power, and other parameters are the same, and both chargers have an EU adapter and a UK adapter.
Q5. I am worried that when twistering the USB-C port of the cable when charging my Steam Deck directly would cause some effects on the product lifespan of CH4504/CH6504.
A5. When encountering the angle needs to be twistered, you could attach the 90 degrees adapter to the USB-C port of the cable and use the charger.
Q6. What is the difference between charger CH4504 and charger CH4502?
A6.
1.CH4504 comes with EU/UK charger while CH4502 does not.
2.The length of CH4504 is 10 FT while CH4502 is 5 FT long.
3.The output of CH4504 is 5V⎓3A, 9V⎓3A, 15V⎓3A, 20V⎓3.25AAnd the output of CH4502 is 5V⎓3A, 9V⎓3A, 15V⎓3A, 20V⎓2.25A.
FAQ
Q1. Sometimes the charger gets warm when charging, will it be safe?
A1. As with MagSafe Charger, to extend the lifespan of your battery, if the battery gets too warm, software might limit charging above 80 percent. When the temperature drops, it will charge again.Please don’t worry, it will be safe.
Q2. Can i use 5W or 12W USB Power Adapter for it?
A2. I am afraid not. Please use 18W, 20W or higher power wall adapters instead of 5W or 12W APPLE USB Power Adapters to ensure that the device can provide 15W of charging power.
Q3. What is the maximum output power?
A3. Power output of up to 15W MAX , for iPhone is 7.5W MAX.
Q4. Can I use it to charge my AirPods?
A4. YES. But AirPods 2/3 or AirPods Pro have to equipped with AirPods MagSafe Charging Case.
Q5. Does this wireless charger affect battery health over time?
A5. The factors that determine the battery life are the speed and temperature of the battery charging. As long as the phone battery is properly charged, it will not affect the health of the battery.
Q6. Does it stop charging when the battery is full?
A6. When the battery is full, the magnetic wireless charger will not stop charging. It will continue to charge in trickle flow mode.
FAQ
Q1. What is included in this speaker gift?
A1. You will get 1*Bluetooth Speaker, 1*Lanyard, 1*USB C Cable, 1*Manual.
Q2. Can it charge iPhone wirelessly?
A2. Yes, this bluetooth speaker supports MagSafe charging for iPhone 14/13/12 series.
Q3. Is this a Bluetooth speaker?
A3. Yes, it is a 3-in-1 Bluetooth wireless speaker with Bluetooth speaker, phone stand and wireless charger functions.
Q4. Can I buy this Bluetooth speaker as a gift for someone?
A4. Of course, it is ideal as a birthday gift or for your loved ones and friends on Mother
FAQ
Q1. Does this HC4503 fit in my JSAUX Carrying Case?
A1. Yes, it could be put in JSAUX Carrying Case BG0102/BG0103/BG0106/BG0105.
Q2. What HDMI cable should I use to support this Charger Dock?
A2. It supports HDMI 2.0.
20000mAh 65W PD移动电源
Description
- 【65W高速充电】 :这款移动电源支持PD65W快充,可以快速为您的设备充电,包括Steam卡带,充电速度可达45W,确保您随时随地电力充足。
- 【20000mAh 大容量】:这款便携式充电器提供充足的电池续航时间,可让您的设备全天保持电量充足,是长途旅行或忙碌外出时的完美伴侣。
- 【智能显示屏】:智能数字显示屏可让您随时了解电池电量、电压和电流,方便您掌握充电需求。它还能在出现安全问题时发出警报,是一款智能便捷的设备充电解决方案。
- 【多重保护】:这款便携式充电器内置过流、过压、过热和短路保护,确保您的手机和人身安全。
- 【多输出端口】:这款便携式充电器配备两个 USB-C 端口和两个 USB-A 端口,可同时为多个设备提供多样化的充电选择,是家庭或团体出行必备之选。内置充电线,无需携带额外的充电线,即可随时随地轻松充电。
-
【通用兼容性】:兼容多种 USB C PD 设备,包括 Steam Deck、Steam Deck OLED、ROG Xbox Ally、ROG Xbox Ally X、ROG Ally、ROG Ally X、Legion Go 2、Switch 2、Switch、iPhone、三星 Galaxy、华为等,是满足您所有移动充电需求的终极解决方案。
FAQ
Q1. Why cannot I purchase the power bank PB6501?
A1. Due to the limitations of the logistics provider, the Power Bank PB6501 can only be shipped to the following countries and regions(we are still looking for a better solution), we are sorry for the inconvenience. USA / UK / Germany / Austria / Canada / Belgium / Czech Republic / Denmark / Estonia / Spain / Finland / France / Greece / Hungary / Italy / Lithuania / Luxembourg / Netherlands / Poland / Sweden / Slovenia / Slovakia / Portugal / Latvia / Bulgaria / Romania / Croatia / Ireland
Q2. Will a powerbank obstruct the intake vents when installed?
A2. The Power Bank is tied horizontally, and there is a certain distance from the game console, which will not block the air inlet and outlet of the game console.
Q3. Iam worried about putting heat into the steam deck from the battery use?
A3. When the power bank is in use, the shell heat will not be very high, and it will not cause the temperature in the game console to rise.
FAQ
Q1. What is the width that can be accommodated?
A1. 2cm is fine.
Q2. Will it block the SD vent and affect heat dissipation?
A2. Of course not.
Q3. Will I still be able to use the SG0104 with the Killswitch case on my Steam Deck?
A3. No, because the groove is not enough to accommodate the thickness of the SD after the Killswitch is installed.
掌上游戏机防滑支架
Description
- 【可折叠,方便携带】这款便携式可折叠支架让您随时随地畅享 Steam Deck 或 ROG Ally 游戏体验。它设计小巧,可轻松放入口袋或包中,是旅行或出差的理想之选。
- 【解放双手】有了这款支架,您可以解放双手,随时随地享受您的 Steam Deck/ ROG Ally 。
- 【角度可调】支架支持 0° 至 90° 的角度调节,您可以灵活地调整设备的角度,找到最舒适的观看角度。
- 【坚固耐用,永不松动】这款支架的旋转部分采用加固材料制成,确保其坚固耐用。无论折叠或展开多少次,都不会断裂或变形。旋转顺畅紧密,为您的蒸汽熨斗提供稳定安全的支撑。
- 【广泛兼容性】兼容 Steam Deck/OLED、ROG Ally/X、Switch、Switch 2 和 Legion Go。对于 Legion Go 2 / Legion Go S,支架仅支持裸机使用。不兼容 ROG Xbox Ally/X。
FAQ
Q1. Would an ipad with a heavy-thick case fit into the groove?
A1. Fit fine. The hook that the iPad sits in has a platform of about 1’’.
Q2. What are the dimensions of the plate that the tablet leans on?
A2. 5.3” x 3.4”, and it supports a 11” tablet very securely, both horizontally and vertically. However, Please note that it does not work with tablets larger than 12 inches.
Q3. Is it made of stainless steel, brushed steel, or plastic?
A3. None of the above. JSAUX tablet holder is made of high quality alloy to ensure its stability and durability. Also its surface is frosted to avoid scratching your tablet.
Q4. Is this tablets holder adjustable in angle?
A4. Yes, you can adjust it to any angle you want.
Q5. Does the stand "give" if you are pressing the home button on the bottom of a tablet or is it locked securely in place?
A5. The stand has a rubber buffer between the upper stand and your device. It keeps the device from sliding. There is also a lip that keeps it from coming off at the bottom. Unless you are very hard on the button it should not slide.
FAQ
Q1.Can the stand adjust the angle arbitrarily according to the direction I want?
A1. Of course! The stand is equipped with two 360° adjustable rotations, and the 360° rotations are shown in the figure below. (It is recommended to hold the bottom firmly before twisting, and you will hear a click when twisting).
Q2.Why do I hard to adjust the height and angle of the Stand?
A2. It is recommended to snap the bottom clip in the position to be fastened, tighten it and then adjust the angle and height.
Q3.I feel that the adjustable rotation is a little loose after I use it for a period of time. What should you do?
A3. We include an L-shape hexagonal wrench for tightening to the right level at any time. Please note, do not tighten it too much, or the rotation will be stuck.
Q4.Does it fit the edge of my table/headboard/cabinet?
A4. The adjustable clamp base can vary from 0 to 2.9 inches (0-75 mm). It can be clamped as long as the thickness of the edge of your furniture is within this range. Also, we recommend clip it to something flat will be more stable.
Q5.Does it fit my phone?
A5. The phone holder can support devices of 2.5 to 4.1 inches (64-105 mm) in width devices. JSAUX Universal Cell Phone Holder is compatible with iPhone 14/14 Pro/14 Pro Max/14 Plus/iPhone 13/13 Pro/13 Pro Max/13 mini/iPhone 12/12 Pro/12 Pro Max/12 mini/iPhone 11/11 Pro/11 Pro Max/iPhone X XR XS Max/iPhone 8, Samsung Galaxy, Google Pixel and almost all cell phones.
FAQ
Q1. What diameter cup holder can it support?
A1. Cup holders with a diameter of 55-110mm are supported.
Q2. What is the length range of the bracket?
A2. The length of the bracket is 255-391mm (excluding the base).
Q3. Will it affect the air vent and interfere with the airflow?
A3. No, the bracket is installed on the cup holder, so it will not interfere with the airflow through the air vent.
Q4. How to use this bracket?
A4. 1. Place the base of the bracket into the cup holder in the car, hold the bracket with one hand, and use the other hand to turn the knob on the base clockwise to tighten the knob until the bracket is steady.
2. Adjust the transverse and longitudinal axles on the bracket until the phone clip is in the right position.
3. Open the phone clip and fix the phone to use it normally.
Q5. How to shorten the length of the bracket correctly?
A5. Pay attention to the Alignment mark, align the two up and down, and compress the short bracket down.
Q6. What should I do if the shaft of the bracket is loose?
A6. The shaft can be tightened with our included hex wrench for extra strength.
FAQ
Q1. Will the pressure from the front mounts damage the screen protector from the pressure placed upon it?
A1. No, it will not. With silicone pads on three sides for protection, the screen stays safe unless you go overboard with force. Once the base mount’s knob is tightened and holds the screen securely, no need to crank it further.
Q2. Can I use my iPhone 14 with a phone case on?
A2. No, unless it is a magnetic phone case. Otherwise, the magnetic force gets weakened through the case and the phone is more likely to fall off.
Q3. Can I use it on a laptop or monitor?
A3. The base clamp can support screens with a frame width > 6mm and a thickness ranging from 12-18mm, as long as the overall thickness of the screen is evenly distributed. If your screen meets these thickness requirements, then it is compatible for use.
Q4. How to use this metal ring?
A4. For non-magnetic phones, attach the metal ring to the back of your device. After applying the adhesive, let it sit for 10 minutes to ensure a stable bond before use. Remember, the magnetic ring is designed to support phones weighing less than 300g.
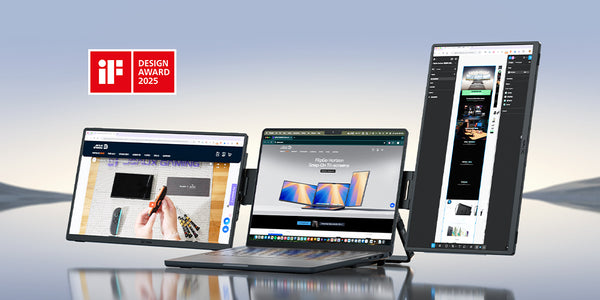
FlipGo 便携式双显示器
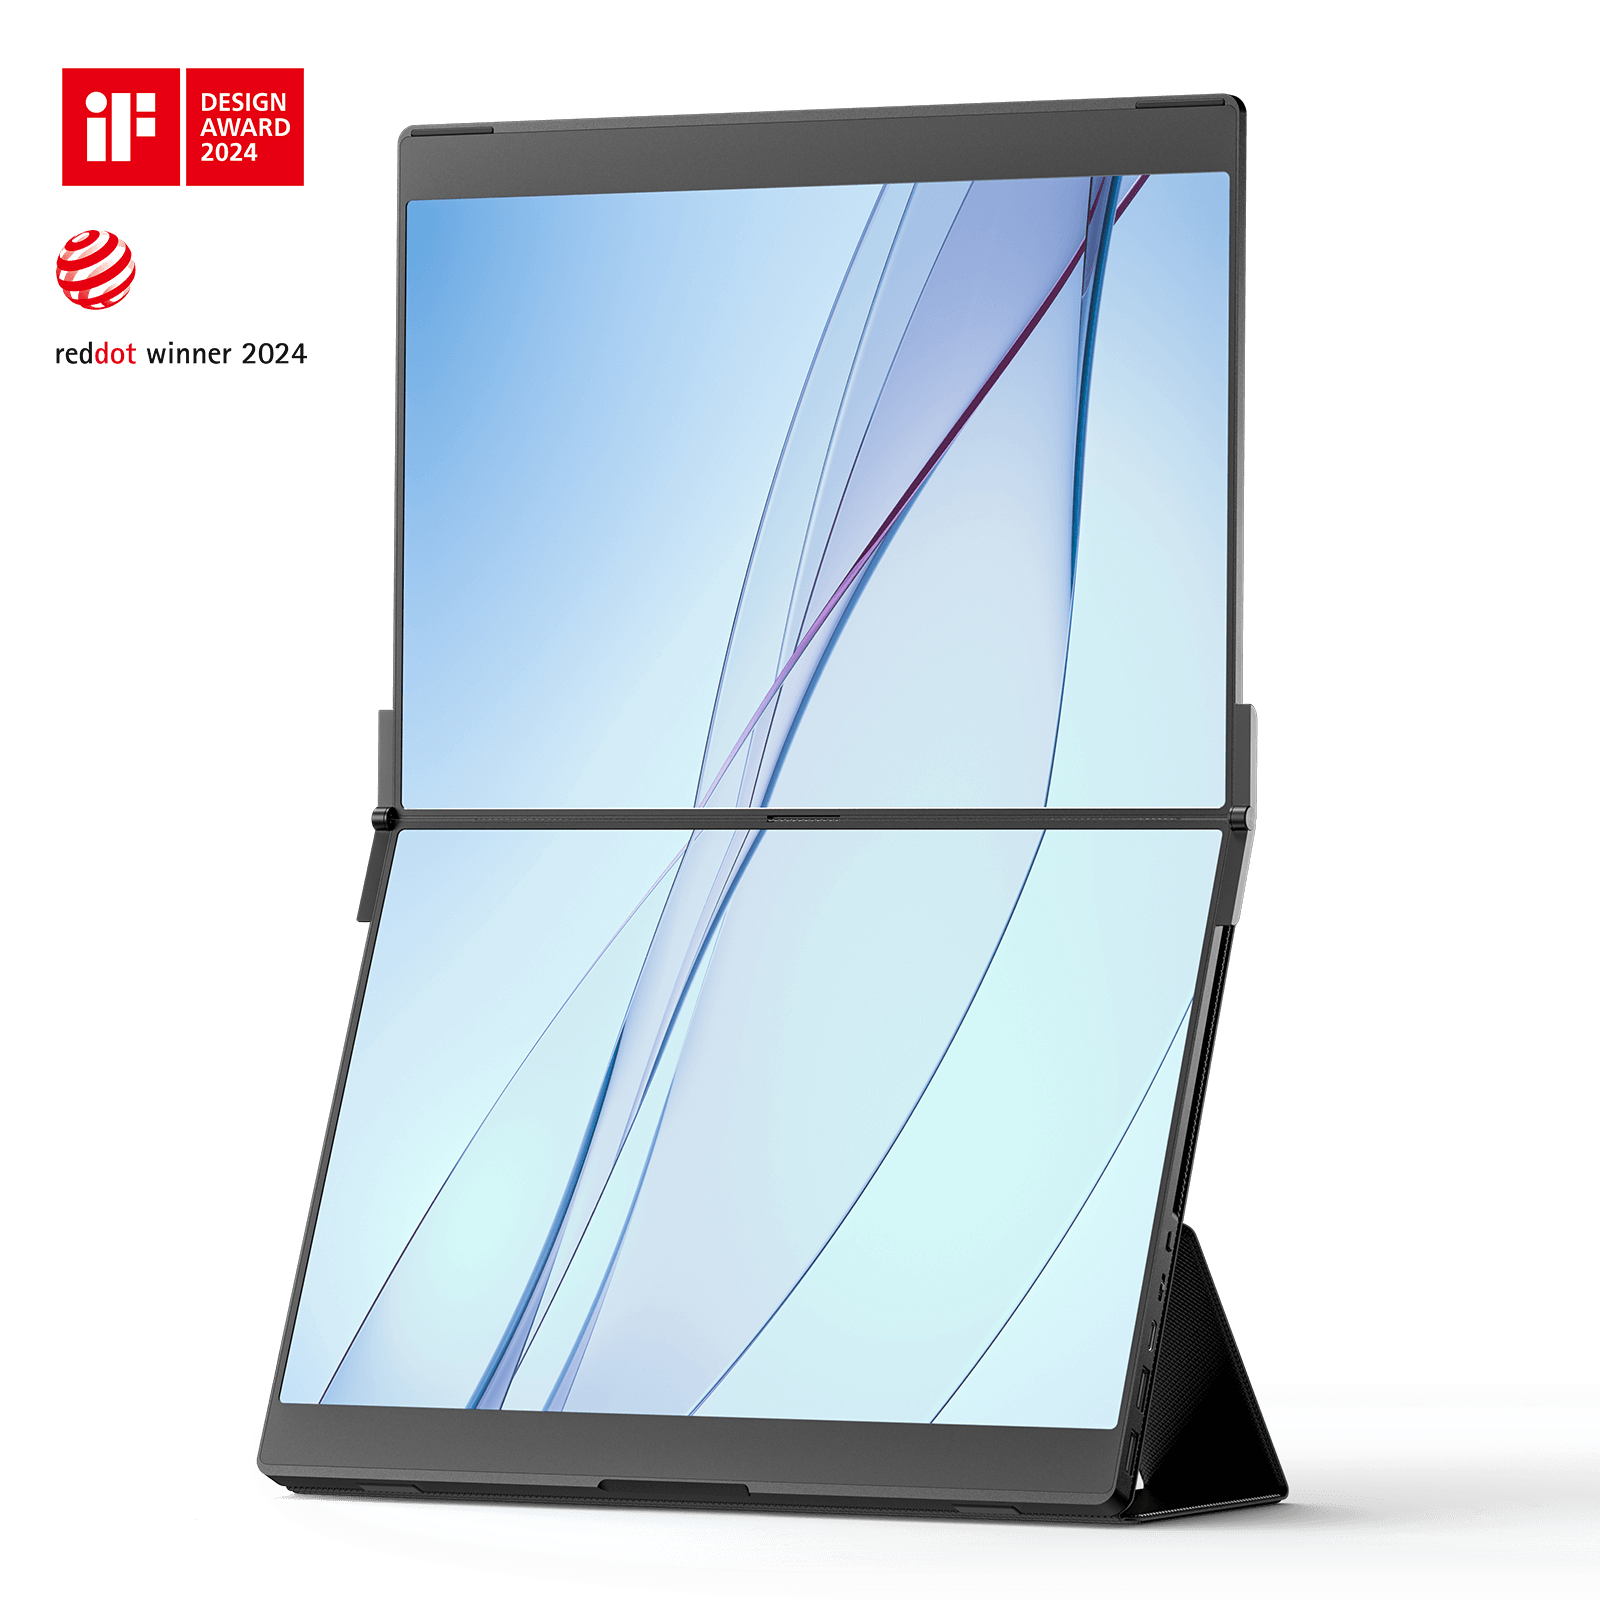
Description
- 【堆叠式显示屏,提升工作效率】 FlipGo 彻底革新了桌面显示屏,将显示屏垂直堆叠,打造出近似正方形的宽高比,减少头部转动,提升专注力和工作效率。其超窄边框将两块屏幕无缝衔接,带来沉浸式、流畅的观看体验。
- 【双屏,提升您的工作效率】撰写论文和处理多个来源时,双屏便携式显示器可简化流程。它支持高效的分屏浏览,灵活地追踪想法和灵感,并轻松处理多个桌面窗口。
- 【一根线连接两块屏幕】 FlipGo 可直接从笔记本电脑的 USB-C 端口供电,只需一根线即可点亮两块屏幕,支持“一屏多屏”或“UltraView”模式。连接外部电源后,笔记本电脑即可充电。
- 【不同视角,提升工作效率】 FlipGo 拥有两个独立的显示屏,但可以合二为一,一键切换显示内容。生产力不再受限,你的视角也不再受限。
- 【可触摸屏,提升生产力】 FlipGo 为 macOS 和 Windows 带来双屏触控和手势支持。您不仅可以将 FlipGo 用作常规触摸屏,还可以将其用作 MacBook 的第二块触控板,从而最大限度地提升您的生产力。
FAQ
Q1. How to enter UltraViews mode?
1. Make sure you are using the FlipGo Pro version and successfully connected to your laptop. Because the non-Pro version does not support UltraViews mode.
2. Wait for the screen to light up and verify the screen mode. If it is not UltraView mode, please click the display switching button on the left side of FlipGo to switch to UltraView mode.
(Note:USB-C port and Mini HDMI port both can support UltraView mode.)
Please refer to the video for details:
Q2. Why can I only get a mirroring screen? How to enter DuoViews mode?
For mac
●If you are using the Pro version, please install and enable the DisplayLink driver first, and then use a USB-C cable to connect the DisplayLink port (marked double rectangles overlapping) and your laptop. Since Macbook only supports SST, you need to use DisplayLink to achieve a dual-screen extended display.
●If you are using the Standard version or the Touch version, please use the following method:
Method 1:
The laptop should be connected to the DP port (marked D-shaped) and HD1 (Mini HDMI) port at the same time to achieve a dual-screen extended display.
Method 2:
The laptop should be connected to the HD1 (Mini HDMI) port and HD2 (Mini HDMI) port at the same time to achieve a dual-screen extended display.
●After the connection is successful, you can go to "System Preferences" -> "Display" to view FlipGo’s settings.
For Windows
●Please use a USB-C cable to connect the DP port (marked D-shaped) and your laptop. (Note: The FlipGo Pro version only supports mirroring mode when using the HDMI port.)
●If you are using the Pro version and connected to the DisplayLink port (marked double rectangle overlapping), please install and enable the DisplayLink driver.
●If you are connecting to the HDMI port.
The laptop should be connected to both the HD1 (Mini HDMI) port and the HD2 (Mini HDMI) port for extended display
●After the connection is successful, in Windows, right-click on the desktop, select Display Settings, and then select Extensions.
Q3. Is there any usage tutorial?
Please check it here.
Q4. There is no signal after connecting.
● Power supply problem:
Please use the included power (PD 65W )supply to power FlipGo.
● DisplayLink problem (Only for Pro version):
If it is connected to the DisplayLink port (marked double rectangles overlapping) , please install and enable DisplayLink. You can check whether the screen is turned on in the DisplayLink settings.
Click here to download DisplayLink.
● Connection cable problem:
Check whether the HDMI to Mini HDMI or USB-C to USB-C cable is firmly connected, and try changing a cable to eliminate the cable problem.
● Laptop does not support video output:
Please check whether your USB-C port supports DP Alt mode. It is recommended that you contact the device manufacturer to confirm.
● Display setting issues:
On the connected device, check the display settings to confirm that the portable screen is detected and set to extended or mirrored display.
In Windows, you can right-click on the desktop, select "Display Settings", and confirm the display status of FlipGo in the settings.
In Mac, you can go to "System Preferences" -> "Display" to view FlipGo’s settings.
If the above checks cannot solve the problem, there may be a hardware failure in the portable screen or the connected device. You can try to connect the portable screen to other devices for testing to eliminate faults in the portable screen or the device itself.
Q5. Where to download DisplayLink?
Q6. Why do I feel the picture is a bit blurry?
Due to Apple system limitations, macOS does not enable its Retina-based high pixel density mode when connecting to a non-4K third-party screen.
1. It is recommended to use the default resolution.
2. Download the free version of BetterDisplay 2 to adjust HiDPI. When connected to the USB-C1 port, installing the free version of BetterDisplay 2 can unlock other clear resolution combinations.
Note: When connecting to the DisplayLink port (marked double rectangle overlapping), additional HiDPI options cannot be enabled due to DisplayLink limitations.
Click here to download BetterDisplay 2
Q7. Why is HiDPI not shown? How do I adjust HiDPI?
Please connect to the DP port(marked shape of a D). After installing the free version of BetterDisplay 2, you can unlock other clear resolution combinations.
Note: When connecting to the DisplayLink port (marked double rectangle overlapping), due to DisplayLink limitations, additional HiDPI options cannot be enabled.
Click here to download BetterDisplay 2
Q8. Why can not I touch it? Why does the FlipGo screen actually respond when I touch it somewhere else?
For Windows
1.Use the included full-featured USB-C cable to connect the FlipGo’s DP port(marked shape of a D) and your computer USB-C port.(Note: HDMI port only provides video signal transmission and cannot realize touch function)
2.Press "Win+R" to open theRun dialog, enter "shell:::{80f3f1d5-feca-45f3-bc32-752c152e456e}" and press Enterkey to bring up the tablet settings interface.
3.Or you can also access the tablet settings page through the Control Panel (for devices equipped with a touchscreen only).
Search for ’Control Panel’ in the search bar > Hardware and Sound > Tablet Settings.
4.In the display section, select "FlipGo-A1," click "Settings," and then choose "Touch Input."
5.Follow the on-screen instructions to designate the current screen as the touch screen, then lightly press the Enter key.
For Mac
The Mac system does not natively support touch. The touch function is implemented through a simulated trackpad. You need to move the cursor to the position of the touch screen to obtain a simulated touch experience.
1.Use the included full-featured USB-C cable to connect theFlipGo’s USB-C2portand your computerUSB-C port.(Note: HDMI port only provides video signal transmission and cannot realize touch function)
2.Open Settings > Display > Arrange Displays, then relocate the menu bar to FlipGo.
3.Move the cursor over to the desktop displayed on the FlipGo.
Click here for more setting details.
★HDMI cannot realize touch function signal transmission, because HDMI only provides video signal transmission, please connect the laptop through a USB-C cable.
Q9. Why can not I adjust the brightness?
When FlipGo is not connected to an external power, due to insufficient power from the laptop power supply port (especially when the battery is low), FlipGo will limit the screen brightness to 10% and disable other functions in order to ensure basic display requirements. For a better experience, we recommend you use an external power supply of 65W or higher to power the FlipGo.
And JSAUX takes customer feedback very seriously. If you would like to be able to adjust the brightness without being connected to external power, please let us know.
Q10. How to use the menu button?
The menu button uses a pulsator button, which needs to be pressed in place to call out the menu.
1-Press the menu dial to open the OSD menu, then press the power/back button briefly to return.
2-Move the dial up and down to adjust the selection box position/adjustment value.
NOTE: When not in menu mode, turn the dial to adjust brightness.
Q11. How to use the stand?
Please go to our manual page -choose “4 different stands” to get the usage guide. There will be tutorials on how to use our four different brackets.
Q12. How to switch between horizontal and vertical screens?
For Mac
When connected (the logo is in the shape of a D), adjust the rotation of FlipGo in macOS system preferences;
When connecting the DisplayLink interface (the logo is a double rectangle overlapping), adjust the rotation of FlipGo in the DisplayLink Manager.
For Windows
Access Windows Settings, navigate to Display Settings, and adjust the rotation angle accordingly.
For reference:
Q13. Does FlipGo support Steam Deck, Switch, iPad, and Samsung Dex?
Our portable screens can support devices equipped with DP Alt Mode (Type-C video output function). However, we do not recommend using it with handheld consoles (such as Steam Deck, Switch), smartphones, tablets, etc. Because these devices may have display limitations (such as the inability to customize the output resolution, the inability to set rotation, and the inability to support MST), compatibility issues may occur during connection (such as abnormal display, distorted images, or even the inability to output the display at all).
Steam Deck LCD 和 OLED 的冷却风扇
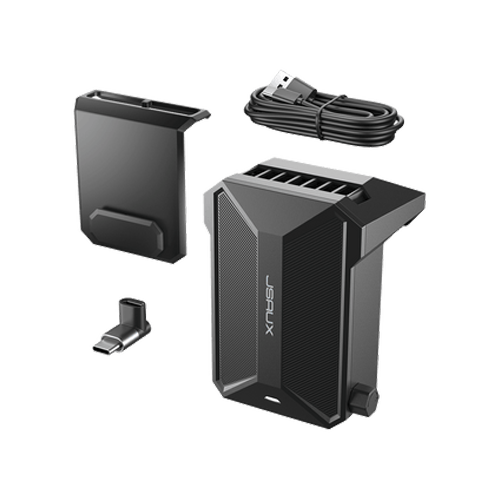
Description
- 专为 Steam Deck LCD 和 OLED 设计:这款 Steam Deck 冷却风扇专为 Steam Deck 设计,可最大限度地延长设备的使用时间,带来更长、更好的游戏体验。
- 可调速风扇:您可以随时根据需要调节风扇速度,提供定制的冷却体验。
- 电池寿命长:充满电只需 1.5 小时,Steam Deck 冷却器即可连续工作 4-6 小时,方便随时随地使用。
- 快速冷却:快速冷却功能可在短时间内大幅降低游戏机的温度,防止过热并提升游戏体验。
- 显著的温度下降: Steam Deck 冷却器是冷却 Steam Deck 的最佳方式,可大幅降低温度,让您可以充分享受游戏,而无需担心过热。
- 当散热风扇没电,连接线充电时,默认开启最低风速,无法调节,如需开启最高风速,必须先关闭后开启。
- PC0104 中的冷却器套件配备了 GP0200 冷却风扇。
FAQ
Q1. How to install the cooling fans?
A1. If you want to use with PC0104:1. Install the PC0104 protective case on the Steam Deck2. Slide the cooling fans down to the chute on the back of PC0104.If you want to use it directly on Steam Deck:1. Paste the mounting sticker on the Steam Deck;2. Slide the radiator from top to bottom and fix it on the chute where the patch is mounted.
Q2. How to adjust the wind speed?
A2. If you turn the switch knob clockwise, the wind speed will gradually increase, and if you turn the switch knob counterclockwise, the wind speed will gradually decrease until it is turned off.
Q3. I do not want to buy the PC0104 kit, can I just want to buy the cooling fans?
A3. Sure you can, Our fans can be directly adapted to the steam deck.
Q4. Will the cooling fans interfere with the internal air pressure of the Steam Deck?
A4. No, the cooling fans are mounted on the Steam Deck’s air outlet (top), not the air inlet (back).Because our cooling fans draw air from the air outlet, it will increase the air intake speed and air intake volume of the air inlet. Resulting in faster air circulation, more heat can be taken away. With the current maximum air volume and rotation speed of our cooling fans, it is not enough to form negative pressure.
Q5. How long does it last on a full charge?
A5. The battery life can be up to 3 hours at the highest wind speed and about 5 hours at the minimum wind speed. The cooling fans will stop working after the power is consumed. It is recommended to use the distribution charging cable and right-angle adapter for charging.
Q6. Is the fan noisy when in use?
A6. With regard to cooler fan noise, at a distance of 25cm from the cooler fan,When the fan is at half speed, the noise level: 44-46DBWhen the fan is at maximum speed, the noise level: 48-50DBAt a distance of 15cm from the fan,When the fan is at half speed, the noise level: 44-48DBWhen the fan is at maximum speed, the noise level: 50-53DB
Q7. What is the difference in compatibility between GP0200 and GP0201?
A7. GP0200:Compatible equipment: Steam deck and steam deck with PC0104 protective case.And compatible with most docks. (Note: The official one needs to be used with our SG0104)GP0201:Compatible equipment: Steam deck and steam deck with PC0101/PC0103/PC0105/PC0106 protective case.(Not with our PC0104/PC0102 case.)
Q8. What is the difference between GP0200 and GP0201?
A8. GP0201 is an upgraded version of GP0200 fan! The new GP0201 fan has a unique telescopic function, you can adjust the height as you like so that it can adapt to more products! Moreover, there is a small upgrade at the bottom of the GP0201 fan, adding a practical bracket function that allows the fan to stand on the table.
Q9. Can GP0201 be disassembled?
A9. Does not support disassembly, GP0201 Cooling Fans are integrated.
Q10. Will the cooling fan GP0201 fit on the docking station?
A10. The cooling fan GP0201 cannot fit on the docking station.