PC0108 Installation FAQ
Have questions? We're here to help >>> official@jsaux.com
Installation tips and precautions
Precautions for disassembly
Q1. What should be paid attention to when disassembling the machine?
1. Replacing the cover of the Steam Deck involves a significant amount of work. The replacement process takes about 3-5 hours and is very difficult. We recommend that you find professional maintenance personnel to do it.
2. For information on changes to the overall device repair policy resulting from the disassembly, please refer to the official information provided by VALVE.
3. To minimize the risk of damage, please discharge the Steam Deck battery to below 25% before disassembly.
4. Before disassembling, please completely power off the Steam Deck and unplug all cables. Please follow the anti-static safety operation rules, such as washing hands before disassembling the device, wearing anti-static gloves, wearing clothes that are not easy to generate static electricity, and maintaining indoor humidity.
5. If you installed a Micro SD card, make sure to remove it before disassembling the Steam Deck.
6. If you use a screen protector on your screen, please remove the screen protector before disassembly.
7. Avoid touching other internal components of the device as much as possible. Please properly store the original parts and screws that have been removed.
8. For more detailed disassembly tutorials, please refer to the tutorial on the official website of JSAUX:
https://jsaux.com/pages/pc0108-installation-tutorial.
Use of accessory tools
1. Screw Driver
Q1. I only received one screwdriver bit, where is the other bit?
The additional screwdriver bit is located inside the screwdriver itself. You will need to pull down the cover at the top of the screwdriver and pour out the other screwdriver bit.
Q2. How do I replace a screwdriver bit?
To replace the screwdriver bit, first unscrew the ring buckle at the front end of the screwdriver, remove the old screwdriver bit, and then install the new screwdriver bit and tighten the buckle.
2. Pry Tools
Triangle Pry Tool: Used to separate the front cover from the back cover.
Blue Pry Tool: Used for separating the front cover and back cover.
Black Pry Tool: Used for prying triggers; can also be used to pry FPC connectors; the flat head can be used to clean screen adhesive.
3. Screen Adhesive Cutting Blade
Used for cutting adhesive when removing the screen.
Q1. Tips for Usage:
1. When separating the front cover and back cover, first insert a pry bar or pry tool; then move or twist the pry bar or pry tool to loosen the locking tabs between the front cover and back cover.
2. Please exercise caution while inserting to avoid damaging internal components.
Screws
Q1. Here are some tips for screwing screws:
1. When loosening the screw, apply downward pressure to ensure that the crosshead screwdriver is securely seated in the cross slot of the screw nut. Rotate the screw counterclockwise.
2. When tightening the screw, first magnetically attach the screw to the tip of the screwdriver, then slowly insert it into the screw slot, ensuring that the screw is inserted vertically. Rotate the screwdriver clockwise.
3. Start by tightening the longer screws before the shorter ones. Follow a diagonal sequence when tightening the screws. Begin with the larger screws and finish with the smaller ones.
4. When tightening screws, it is recommended not to fully tighten them all at once. Instead, tighten each screw partially and then move on to the next one. Once all the screws in a component are partially tightened, proceed to fully tighten them.
By following these techniques, you can ensure proper and effective screw tightening while working with hardware components. Remember to use the appropriate screwdriver size and apply consistent pressure to avoid damage to the screws or the equipment.
Q2. What should I do if the screw threads are stripped?
1. Partially protruding nut remedy: Use a pair of needle-nose pliers to grip the nut and rotate it counterclockwise to remove the screw.
2. Nut and Surface Flush Remedies (follow these steps in order):
a. Try loosening the screw using a flathead screwdriver.
b. Insert a thin double-sided adhesive tape, rubber band, paper, or fabric between the screwdriver and the nut to provide additional grip and try loosening it.
c. Apply adhesive to bond the screwdriver and the nut together. Once the adhesive has solidified, try unscrewing it. Note that this method may be more challenging and is suitable for larger screws.
If the screw threads are stripped, it is important to exercise caution to avoid further damage. The above methods provide potential remedies, but it is advisable to seek professional help if you encounter difficulties or require additional expertise to address the stripped screw threads.
Adhesive
Q1. How to remove the adhesive?
1. Place the entire screen on a large work surface, ensuring there are no obstructions in the middle.
2. Use the provided black pry bar with a flat head to gently peel off the adhesive.
3. Do not use metallic objects to clean the adhesive around the screen.
4. Try to avoid using liquid cleaners near the adhesive.
Q2. How to paste the adhesive?
1. Ensure the surface is clean before applying the adhesive.
2. Confirm the correct position before removing the backing from the adhesive.
3. Align the adhesive with each hole or opening.
4. Press down on the adhesive after applying it to ensure proper contact.
5. Slowly peel off the backing without pulling off the adhesive.
Q3. How to deal with a failed adhesive application?
1. If a part of the adhesive is misaligned, you can remove that portion and replace it separately.
2. If the holes are not aligned or the edges extend beyond the frame, you must remove and reapply the adhesive.
How to remove and install cables?
Q1. Touchpad Vibration Motor FPC Cable
A1. Removal: Use a pointed tool and insert it from the bottom of the inclined side, avoiding the wires. Pry gently from both sides until the connector is detached.
Installation: First, identify the correct orientation of the cable. Once determined, align it with the connector and press it in place.
Q2. Microphone FPC Cable
A2. Removal: Slowly lift the white locking latch slightly upwards, then grip the plastic tab and pull out the FPC cable.
Installation: Open the locking latch, insert the FPC cable, ensure it is aligned properly with the direction of the latch, and press the latch downwards.
Q3. Other FPC Cables
A3. Removal: Pry up the black locking latch. Grip the plastic tab and pull out the FPC cable.
Installation:
1. Open the locking latch and hold the plastic tab.
2. Insert the FPC cable.
3. Ensure that the FPC cable is aligned in the correct direction and angle with the locking latch.
4. Insert it near the white line position.
5. Close the locking latch.
Q4. Fan FPC Cable
A4. Removal: Simply unplug the cable by firmly gripping the connector and pulling it out. Avoid pulling directly on the wires and handle the connector carefully.
Q5. Battery FPC Cable
A5. Removal:First, untangle any adjacent FPC cables. Then, locate the short head of the battery FPC cable. Grip the short head and firmly pull it out from the slot or gap.Installation:Align the FPC cable properly and insert it directly into the slot in one smooth motion.
Q6. I broke/pried the cable during disassembly, what should I do?
A6. For this problem, you can go to a professional repair shop to buy a new cable.
Specific Problems and Troubleshooting
Front Cover
Q1. How to judge whether the front cover is deformed?
1. Put the front cover flat on the table and observe it. Look for any visible signs of warping, bending, or unevenness in its shape.
2. Try installing the screen to see if it fits properly into the front cover. If there is any difficulty in fitting the screen or if it doesn't align correctly, it could indicate a deformation in the front cover.
3. Test the buttons by fitting them into the faceplate. Check if any buttons feel stuck or if there is any obstruction or resistance when pressing them. This could indicate deformation or misalignment.
4. If you have purchased the PC0106 backplate, you can attach it to the front cover and check for any gaps between the front cover and the backplate when they are properly secured together. Any noticeable gaps may indicate deformation or improper fitting.
Q2. How to check if the buttons are compatible with the front cover?
Before installation, you can try placing the buttons in the corresponding buttonhole of the front cover. The buttons that fit properly should freely drop to the bottom without needing to be pressed forcefully. If you notice any interference or if the button holes affect the functionality of the buttons or the normal operation of the device, please contact our customer service team for a free replacement.
Screen
Q1. The steps for removing the screen are as follows:
1. Remove other components that can be detached, taking care not to damage them during the screen removal process.
2. Monitor the surface temperature of the screen during the heating process to prevent overheating.
3. The adhesive on the back of the screen takes around 20-30 seconds to soften after heating. It is recommended to wait a bit after heating.
4. Ensure proper usage of the suction cup, ensuring a firm attachment.
5. After confirming that the screen ribbon cable has been disconnected, position the suction cup in the area where you can exert the most force, preferably in the upper-left corner. This is to avoid users attempting to remove the screen without disconnecting the ribbon cable, which could result in damaging it.
6. Slowly increase the force applied while using the suction cup and closely monitor the gap between the screen and the cover.
7. If the gap remains unchanged after applying a certain amount of force, it indicates insufficient heating and further heating is required.
8. When the gap loosens slightly, insert one corner of the screen adhesive cutting tool about 3-5mm deep.
9. Start cutting the adhesive using the screen adhesive cutting tool, without applying any pulling force on the suction cup at this point.
10. Once the adhesive has been cut on all four sides, use the suction cup to lift the screen.
11. After removing the screen, place it aside and allow it to cool down to ambient temperature before proceeding with further operations.
Please note that these steps should be performed with caution and precision to avoid any damage to the screen or other components. It is recommended to follow the specific instructions provided by the manufacturer or seek professional assistance if needed.
Q2. The taboos for removing the screen are as follows
1. Do not attempt to pry or lever the screen.
2. Avoid using hard or metallic screen adhesive cutting tools.
3. Do not forcefully pull the screen if it has not been adequately heated.
4 Avoid prolonged heating in one specific area of the screen.
5 Do not use excessively high temperatures during the heating process.
6 When heating, try to avoid the middle section of the screen and heat only on the edges.
7. The suction cup should be positioned near the four corners of the screen and should not be fixed it in the middle of the screen for operation.
8. Do not perform the screen removal process while a tempered glass or other screen protector is still attached.
These taboos are essential to follow to prevent screen damage and ensure a safe removal process.
Q3. When removing the screen, the screen is cracked, what should I do?
If your screen is badly cracked, covering it with a layer of clear tape may allow the suction cup to adhere. Alternatively, the very strong tape may be used instead of the suction cup. If all else fails, you can superglue the suction cup to the broken glass.
Q4. After the screen is installed, the bayonet for the screen cable is not seen on the back. What's the matter?
Before placing the screen in the middle frame of the steam deck, please ensure that the cable interface is on the back of the screen to make sure it is on the same side as the hole connecting the screen cable.
Q5. What should I do if the screen protrudes or the screen is uneven after installation?
1. Check whether the original adhesive on the screen and the adhesive on the middle frame have been cleaned and whether the new adhesive is smooth. Note: Be sure to remove the previous adhesive before applying the new adhesive.
2. Check that the 6 small screws on the front are not screwed in place. If the screw caps are elevated too high, they may cause the screen to protrude. Make sure to tighten the small screws appropriately.
3. Check whether the triangular buttons on the bottom cover and the middle frame are aligned and fastened.
Q6. If there is sound but no display or the display is abnormal/pixelated after booting up.
Please check if the screen cable is properly connected. Ensure that the screen cable is securely connected to the appropriate port. Verify if the screen functions properly after ensuring a secure connection. If the issue persists, it could indicate a potential problem with the screen cable or the motherboard. It is advisable to seek assistance from a professional technician to inspect and diagnose the situation.
Button
Q1. What should I do if the ABXY buttons feel worse after installing the cover?
1. Check if the conductive adhesive is properly installed. Ensure that the conductive adhesive is in the correct position and intact.
2. Verify if the screws of the shoulder button components are tightened. Make sure the screws are securely tightened.
3. Ensure that all four sides of the face cover are aligned on the same horizontal plane.
4. Please provide some pictures and send a video demonstrating the issue to our customer support team for further assessment and assistance. Our customer support team will work diligently to assist you in finding a solution.
Q2. The view button and menu button feel bad and rub against the cover, what should I do?
1. Confirm whether the conductive adhesive is installed correctly2. Whether the screws of the shoulder button assembly are tightened3. Please provide some pictures and send a video demonstrating the issue to our customer support team for further assessment and assistance. Our customer support team will work diligently to assist you in finding a solution.
Q3. What should I do if the steam button and quick access button is lower than the front cover?
1. Confirm whether the conductive adhesive is installed correctly
2. Is the button circuit board screw tightened?
3. Please provide some pictures and send a video demonstrating the issue to our customer support team for further assessment and assistance. Our customer support team will work diligently to assist you in finding a solution.
Q4. What is the reason for the button sticking?
If you are experiencing button sticking after installation, the potential reasons could be:
1. Incorrect button placement: Verify that the buttons are installed in their correct positions. Make sure each button aligns properly with its corresponding hole or slot.
2. Deformation of the front cover: If the front cover has undergone deformation, it can cause the button holes to become smaller, resulting in the buttons getting stuck or jammed.
3. Inadequate buttonhole size: If the buttonholes on the front cover are inherently small or not properly aligned with the buttons, it can cause them to get stuck or jammed.
4. Please provide some pictures and send a video demonstrating the issue to our customer support team for further assessment and assistance. Our customer support team will work diligently to assist you in finding a solution.
Audio
Q1. Why the microphone has no input/output?
1. Verify if the microphone ribbon cable is correctly connected.
2. Check if the microphone ribbon cable was damaged during the disassembly process.
3. Ensure that no excessive force was applied to the ribbon cable during disassembly.
4. Verify if the locking latch of the microphone cable is broken or missing.
Q2. Why is there no sound from the speaker?
1. Press the volume buttons to confirm if they can adjust the volume and check if there is any sound after adjustment.
2. Verify if the audio board cable is properly connected.
3. Confirm if the motherboard cable is properly connected.
4. Ensure that the connector on the motherboard for the speaker is correctly connected and that the wires extending from this connector are intact.
It is recommended to carefully check these potential causes and ensure proper connections. If the issues persist, it may be necessary to seek assistance from a professional technician to further diagnose and resolve the problems with the microphone or speaker. Please note that handling hardware components requires caution and expertise to avoid further damage.
Q3. Why does the automatic screen brightness adjustment function fail?
The automatic brightness adjustment function of the screen not working could be due to the following reasons:
1. Check if the audio board cable is properly connected. Ensure that the audio board cable is securely connected to the corresponding interface without any looseness or detachment.
2. Verify if the motherboard cable is properly connected. Ensure that the motherboard cable is securely connected to the screen interface without any looseness or detachment.
3. Check the adhesive on the back of the screen. Confirm that the screen adhesive is correctly applied between the screen and the motherboard without any wrinkles or gaps.
Other Problems
Q1. Unable to connect to the network or experiencing unstable internet speeds after installation
If you are unable to connect to the network or experiencing unstable internet speeds after installation, the following factors could be contributing to the issue:
1. Check if the Wi-Fi cable is properly connected or damaged. Ensure it is securely connected to the designated port on the motherboard. If the cable is damaged, it may need to be replaced.
2. Verify if the shielding cover has been properly installed. The shielding cover helps protect the internal components and can affect the Wi-Fi signal if not installed correctly. Ensure it is securely in place.
Q2. The fan does not spin after installing the front cover
If the fan does not spin after installing the front cover, there could be several reasons:
1. If the machine's temperature is low, the fan may not spin when it is turned on.
2. If the fan still does not spin after launching a game or putting the machine under load, ensure that the fan connector is properly connected. Check the connection between the fan and the motherboard to ensure it is secure.
3. It is possible that the fan itself is faulty. If you have checked the connections and the fan still does not spin, you may need to purchase a replacement fan and install it yourself.
Q3. Device fails to power on
If your device fails to power on, please follow these steps to troubleshoot the issue:
1. Check if the battery is in protection mode, connect with power supply, and attempt to power on the device again.
2. Verify that the power cables inside the device are securely connected. Ensure that the power cable connectors are properly inserted and secured to the motherboard or power unit.
3. Inspect the connections of other cables, including the motherboard cables and screen cables. Make sure all relevant cables are properly connected.
4. Confirm that proper electrostatic discharge precautions were taken throughout the disassembly process. Electrostatic discharge can potentially damage electronic components. Ensure that you used an antistatic wrist strap or other electrostatic protection devices while handling the device.
5. Check if there was any pressure applied to the motherboard, or if any metal objects or liquids came into contact with it during the disassembly process. This can cause the device to fail to power on. Thoroughly examine the area around the motherboard for any foreign substances or damage.
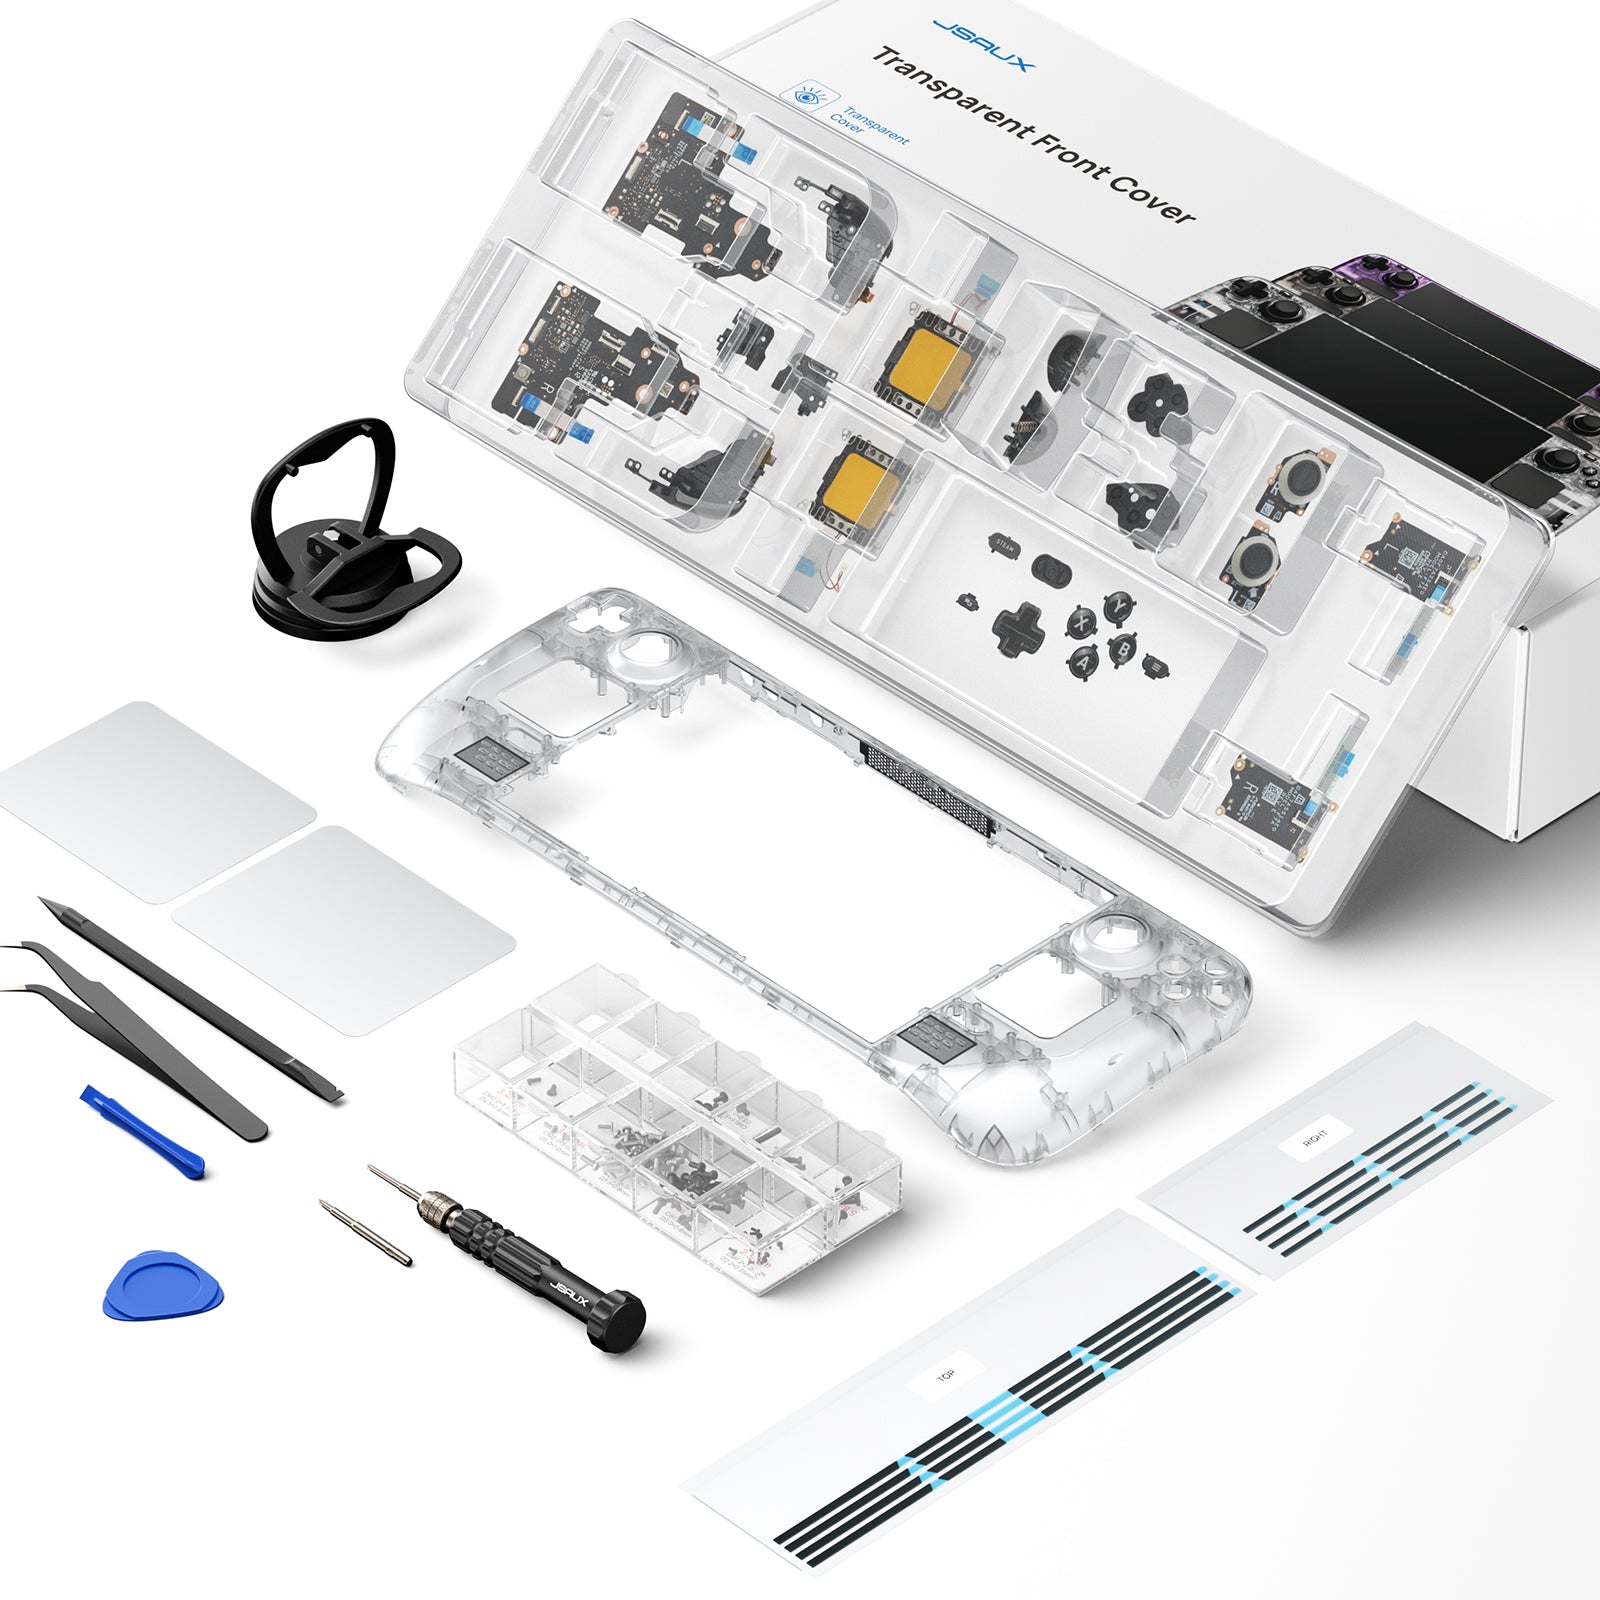
Professional video and text versions of the installation tutorials are provided, please use them together.
Learn More


![#style_[2-pack] for all rog ally models](http://jsaux.com/cdn/shop/files/GP0113A-Anti-Glare-Screen-Protector-for-ROG-Ally-_-ROG-Xbox-Ally-Series-1_jpg.png?v=1762310072&width=92)


![#style_blue&orange [2-pack]](http://jsaux.com/cdn/shop/files/90_-USB-C-to-USB-C-Right-Angle-Adapter-blue-orange-1.png?v=1755238920&width=92)


